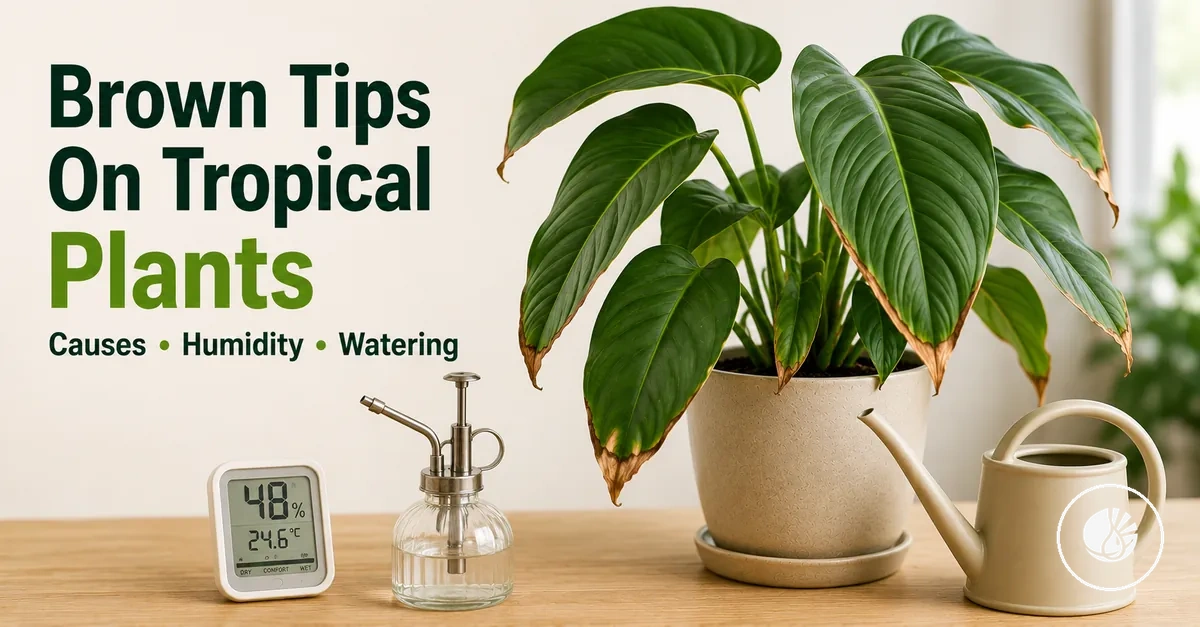
Brown Leaf Tips on Indoor Tropical Plants
When brown leaf tips appear on indoor tropical plants, the likely problem is stress at the leaf edge rather than one certain cause. The stress is often linked to humidity, watering, mineral buildup, fertilizer residue, or an indoor care condition that interrupts steady moisture movement through the leaf.
Indoor tropical plant care solutions are the light, water, humidity, soil, and routine checks used to keep houseplants stable inside indoor rooms. In that care context, brown tips are a visible symptom that should be read with dry air, root-zone moisture, drainage, and recent fertilizer or water changes.
Fixes should follow evidence from the plant and its care routine, because low humidity, inconsistent watering, and excess salts can create similar leaf-tip browning. Before changing several inputs at once, use the symptom pattern to move into troubleshooting indoor plant problems and identify what the brown leaf tips most likely mean.
Damaged brown tissue usually does not turn green again, even when the underlying care problem is stabilized. The clearer recovery signal is steadier new growth with fewer crispy tips after the care condition improves.
What Brown Leaf Tips Mean on Indoor Tropical Plants
Brown leaf tips are a visible stress response that appears at exposed leaf edges, often starting on older leaves before becoming noticeable elsewhere. The affected leaf tip shows where the plant has reacted to a care condition rather than producing healthy green tissue. Brown leaf tips are a care signal, not a diagnosis.
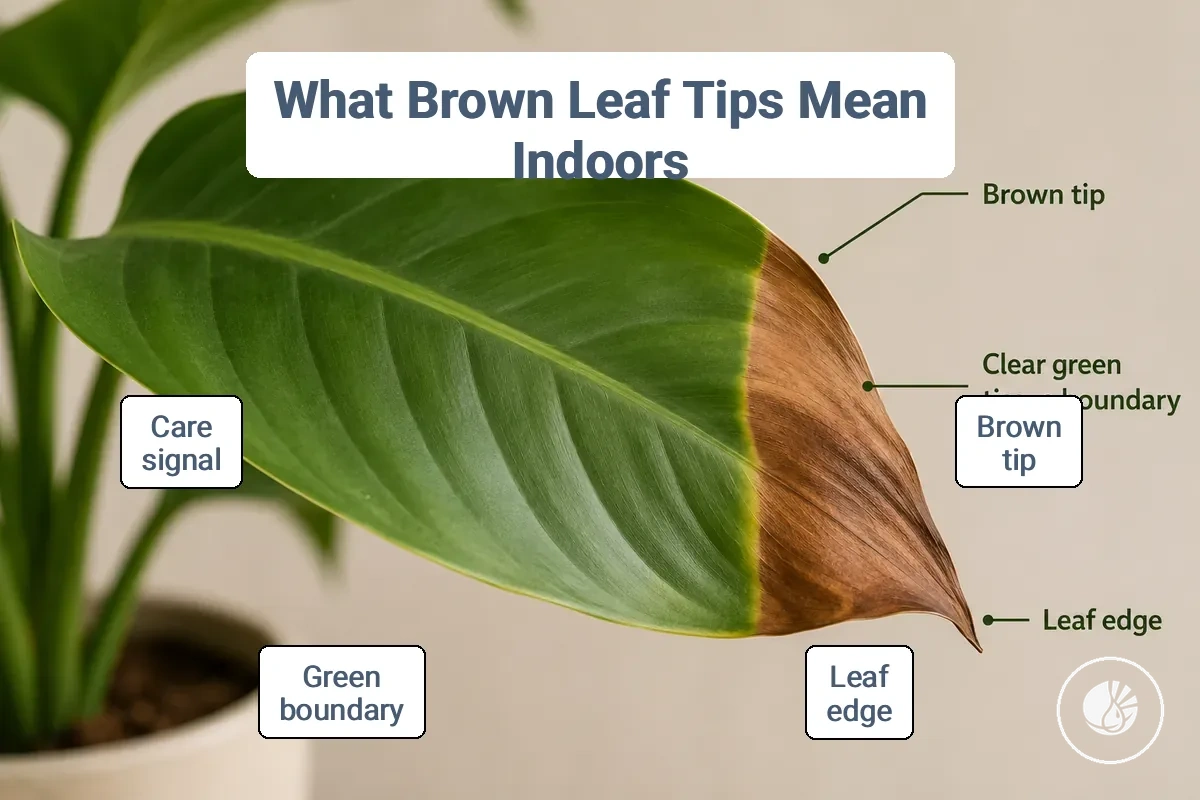
What Brown Leaf Tips Mean on Indoor Tropical Plants can vary because leaf-tip browning may develop under different conditions. Humidity, watering patterns, mineral buildup, and other environmental imbalances can produce similar symptoms, so the visible stress response should be interpreted alongside the plant's overall condition. A damaged tip may remain brown even when new growth appears healthy.
| Symptom pattern | Likely meaning | What to check next |
|---|---|---|
| Brown tips on otherwise stable leaves | A mild or localized stress response | Humidity, watering consistency, and recent care changes |
| Spreading browning across multiple leaves | A broader care condition may be affecting the plant | Watering routine, mineral buildup, and the growing environment |
A few crispy tips on stable leaves may indicate a limited issue that has not progressed further. By contrast, spreading browning across several leaves can be a stronger care signal that the underlying condition is continuing and may need closer evaluation.
Brown Tips, Brown Edges, and Crispy Leaves
When brown tips, brown edges, or crispy leaves appear, the symptom location often changes what the pattern may mean. Brown tips usually begin at the leaf edge near the tip, while brown edges affect the margins, and crispy leaves involve larger areas of dry tissue. Location, texture, and spread are the main separators when comparing these symptoms.
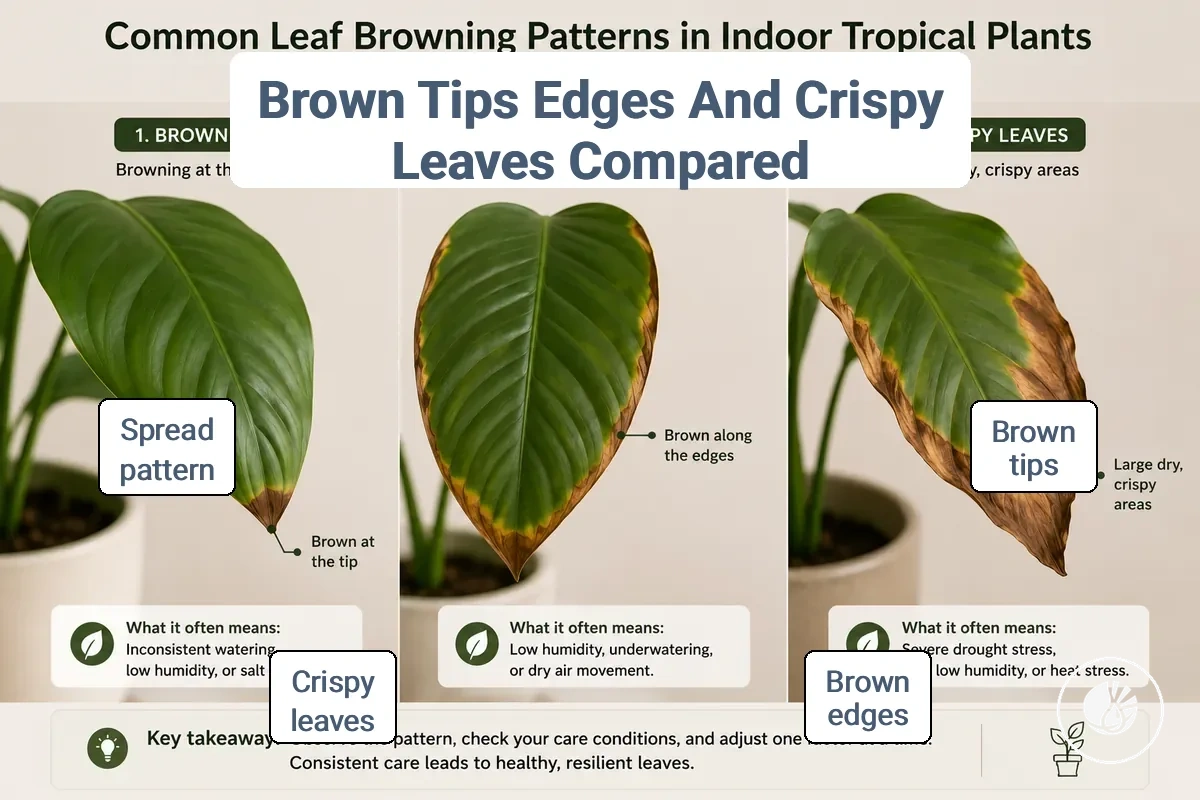
Brown tips, brown edges, and crispy leaves can look similar at first, but the affected leaf area and pattern of spread may point to different care conditions. The comparison below helps separate symptom location, texture, speed of spread, affected leaf age, and whether the issue appears on one leaf or across the plant.
| Symptom | Symptom location | Texture | Spread | Affected leaf |
|---|---|---|---|---|
| Brown tips | Leaf tip | Dry tips or slightly crispy tips | Often localized at first | May begin on older or exposed leaves |
| Brown edges | Leaf margins | Dry or firm brown margins | May extend along the leaf edge | Can affect multiple leaves with a similar pattern |
| Crispy leaves | Beyond the tip or margin | Noticeably dry tissue | May cover larger portions of the leaf | Can appear across more of the plant |
If leaf browning remains limited to a small tip area, the issue may stay within brown-tip troubleshooting. When dry tissue expands across leaf margins or multiple affected leaf surfaces and the spread becomes more widespread, the pattern may indicate a broader plant-wide issue that belongs in troubleshooting indoor plant problems.
Main Causes of Brown Leaf Tips Indoors
When brown leaf tips appear indoors, the cause often relates to moisture balance, air conditions, water chemistry, or the growing environment rather than one certain problem. Indoor tropical plant leaves can respond to low humidity, inconsistent watering, mineral buildup, fertilizer salts, water quality changes, heat stress, airflow, or root stress with browning at the leaf tip. Because similar symptoms can develop from different conditions, a diagnostic check should compare causes before any correction is made.
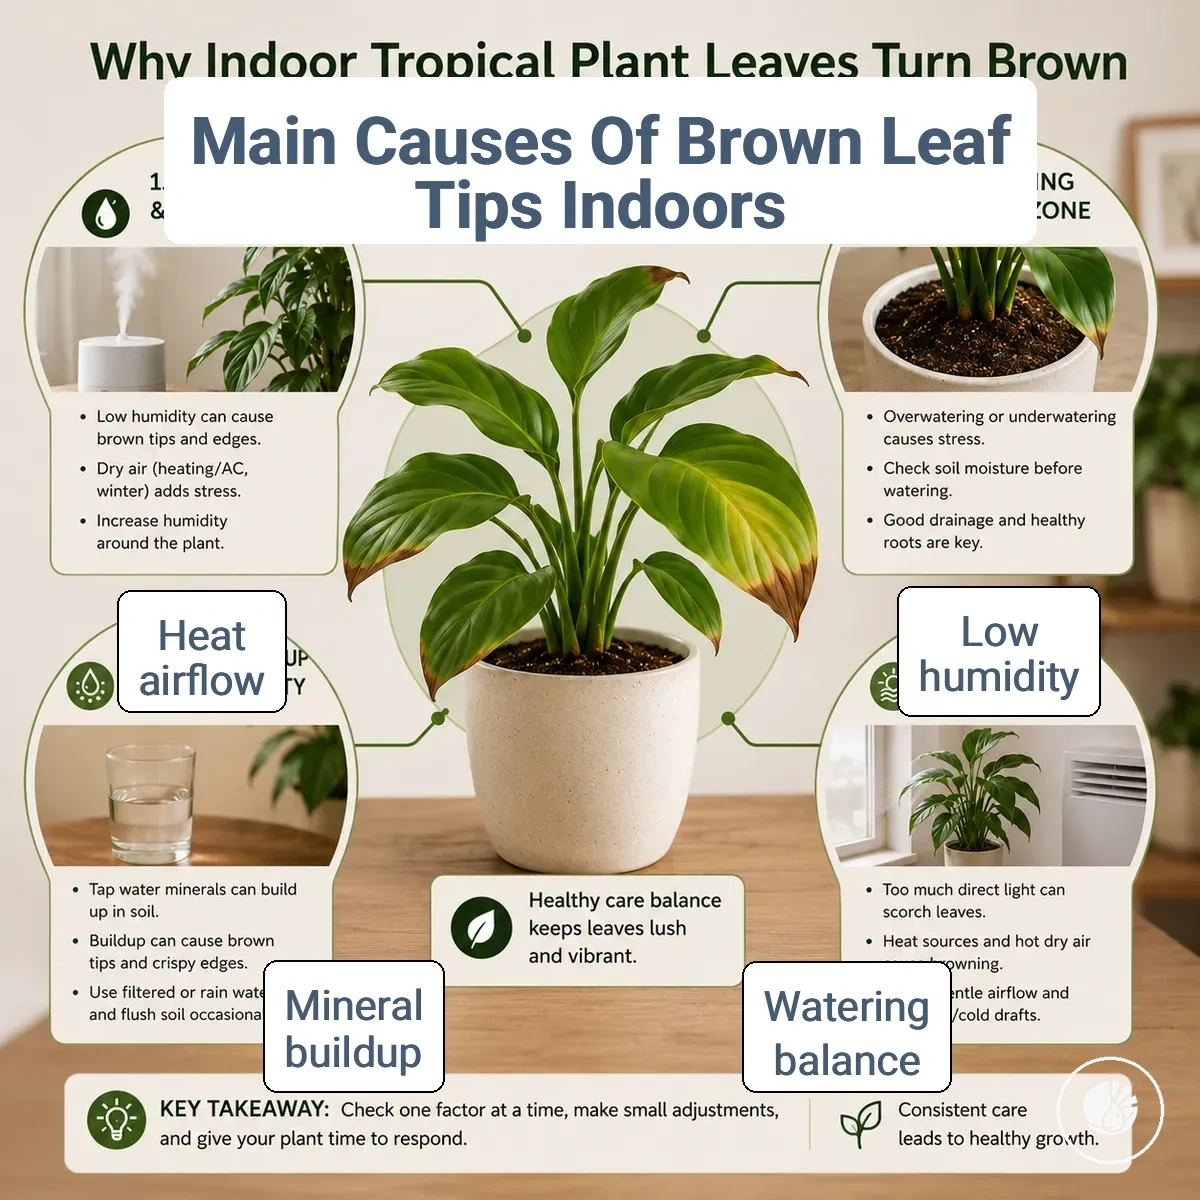
Main causes of brown leaf tips indoors can overlap, and more than one condition may affect the same plant at the same time. The table below groups common cause areas by attribute or condition, visible clue, and first check so the symptom can be evaluated in context.
| Cause area | Attribute or condition | Visible clue | First check |
|---|---|---|---|
| Humidity | Low humidity or dry air | Crispy tips at exposed leaf edges | Review room conditions around the plant |
| Watering | Inconsistent watering or watering imbalance | Brown tips with uneven soil moisture patterns | Check root zone moisture and drainage |
| Mineral buildup | Dissolved minerals accumulating over time | Leaf-tip burn that gradually repeats | Assess water quality and residue signs |
| Fertilizer | Fertilizer salts in the root zone | Browning concentrated at leaf tips | Review recent feeding practices |
| Heat or light | Environmental stress from heat or intense exposure | Drying or browning on exposed tissue | Evaluate nearby heat and light sources |
| Airflow | Persistent airflow around foliage | Dry leaf edges and tip damage | Check vents, fans, or drafts |
| Root stress | Root condition affecting water movement | Tip browning alongside reduced vigor | Inspect overall root-zone condition |
A brown leaf tip pattern may match more than one row in the table. Comparing visible clues before changing care conditions can help avoid overcorrection and keep the diagnostic check focused on the most likely cause.
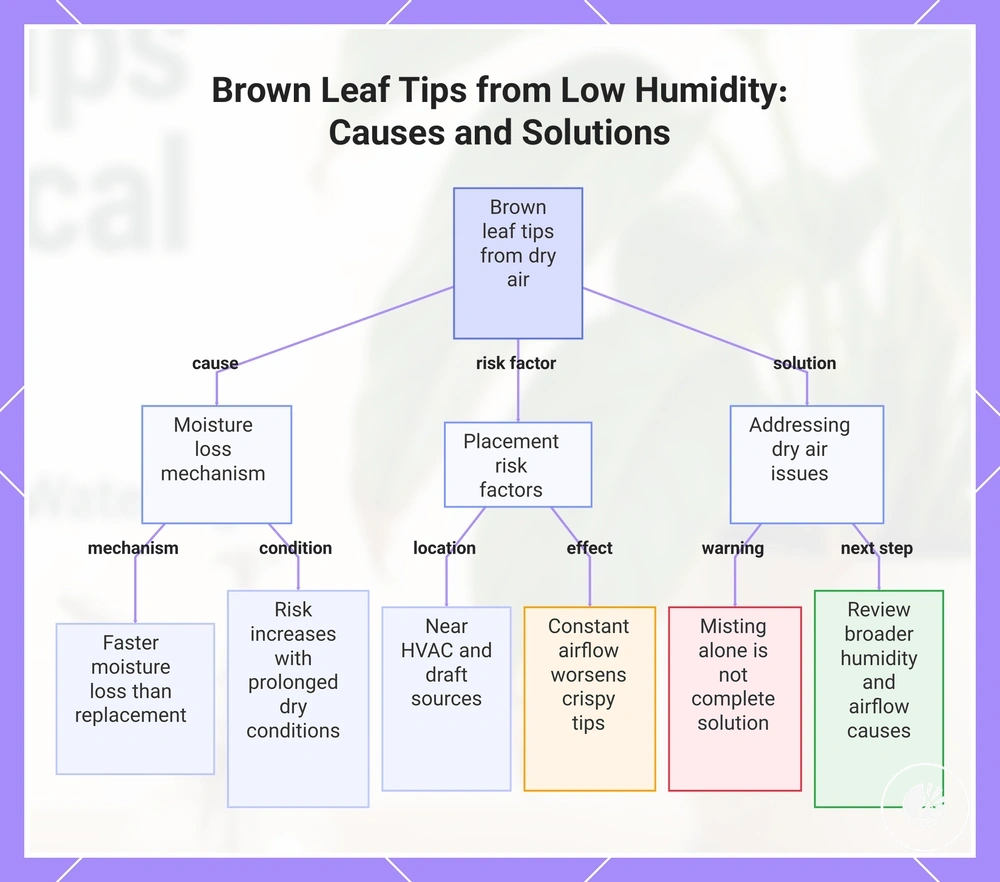
Low humidity and dry indoor air
When brown leaf tips develop, low humidity and dry indoor air can dry the leaf edge and create crispy brown tips. Indoor tropical plants may show leaf-tip dryness when surrounding air removes moisture faster than the plant can replace it. This dry-air risk often increases when room conditions remain dry for extended periods.
Plant placement can influence humidity stress because airflow exposure affects the air immediately around the leaves. A plant positioned near heaters, air conditioners, vents, or a drafty window may experience drier and more fluctuating room conditions than the same plant placed away from direct drafts. For example, crispy brown tips may appear more readily on leaves exposed to constant airflow, while leaves in a more sheltered location may show fewer signs of drying.
Dry air often becomes most noticeable around the leaf edge before affecting larger portions of the leaf. Observable room clues include:
- Plant positioned close to vents
- Nearby heaters running regularly
- Direct airflow from air conditioners
- Drafts from windows or doors
- Noticeable fluctuations in room conditions
Misting alone should not be treated as a complete humidity solution, and humidity needs can vary by plant and environment. If dry-air symptoms continue, reviewing broader humidity and airflow causes may help clarify the source of humidity stress.
This chart explains how low humidity and dry indoor air cause crispy brown leaf tips on tropical plants, the risk factors, and the steps to address the issue.
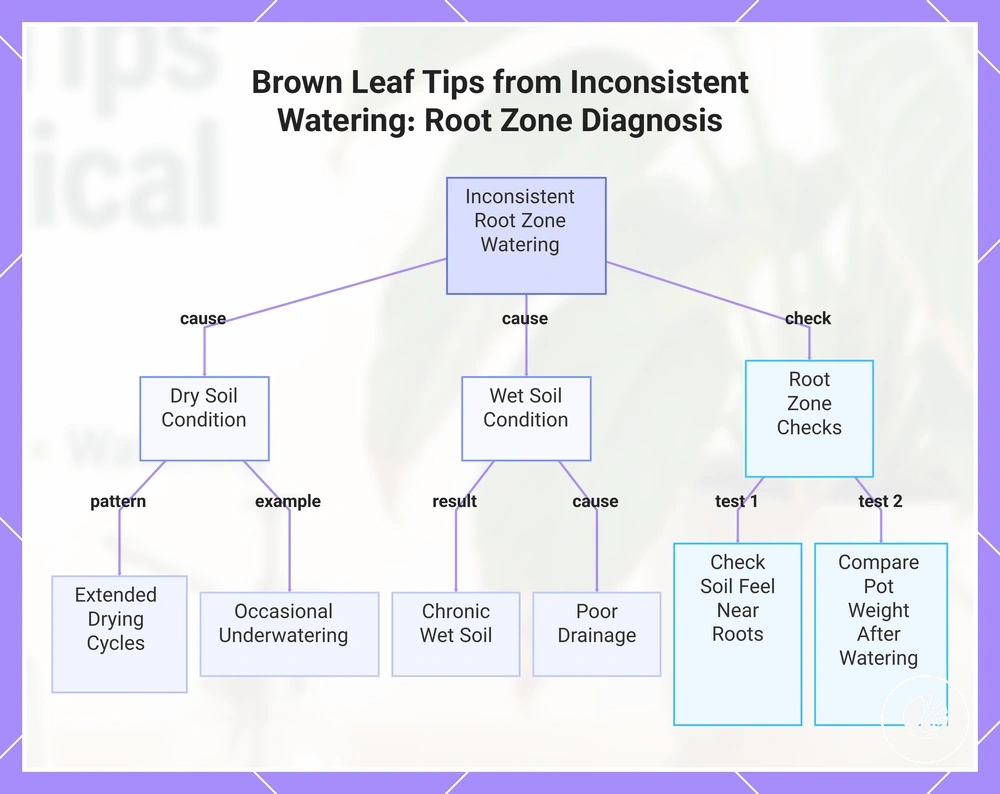
Inconsistent watering around the root zone
When brown leaf tips appear, inconsistent watering is often linked to stress in the root zone rather than the leaf itself. Drying cycles, saturated soil, and uneven soil moisture can reduce water movement to leaf tips and contribute to brown-tip symptoms. Because both dry and wet conditions can create similar signs above the soil line, the root zone needs to be checked directly.
Dry soil and saturated soil can affect leaf tips in different ways, but both may interfere with normal moisture movement through the plant. Occasional underwatering may follow a pattern of extended drying cycles, while chronic wet soil may develop when drainage remains poor and the root zone stays overly moist. The distinction depends on soil moisture, drainage conditions, and recent watering patterns rather than the symptom alone.
To verify whether watering imbalance is contributing to brown tips, review these root-zone clues. For a broader comparison of watering causes, focus on observable conditions rather than a fixed routine:
- Check soil feel near the root zone
- Compare current pot weight with its usual weight after watering
- Look for signs of slow or limited drainage
- Review recent watering patterns and drying cycles
- Note whether soil remains wet or dry for extended periods
This chart shows the two possible watering imbalances (dry vs. wet soil) that cause brown leaf tips and the key checks to identify the actual condition.
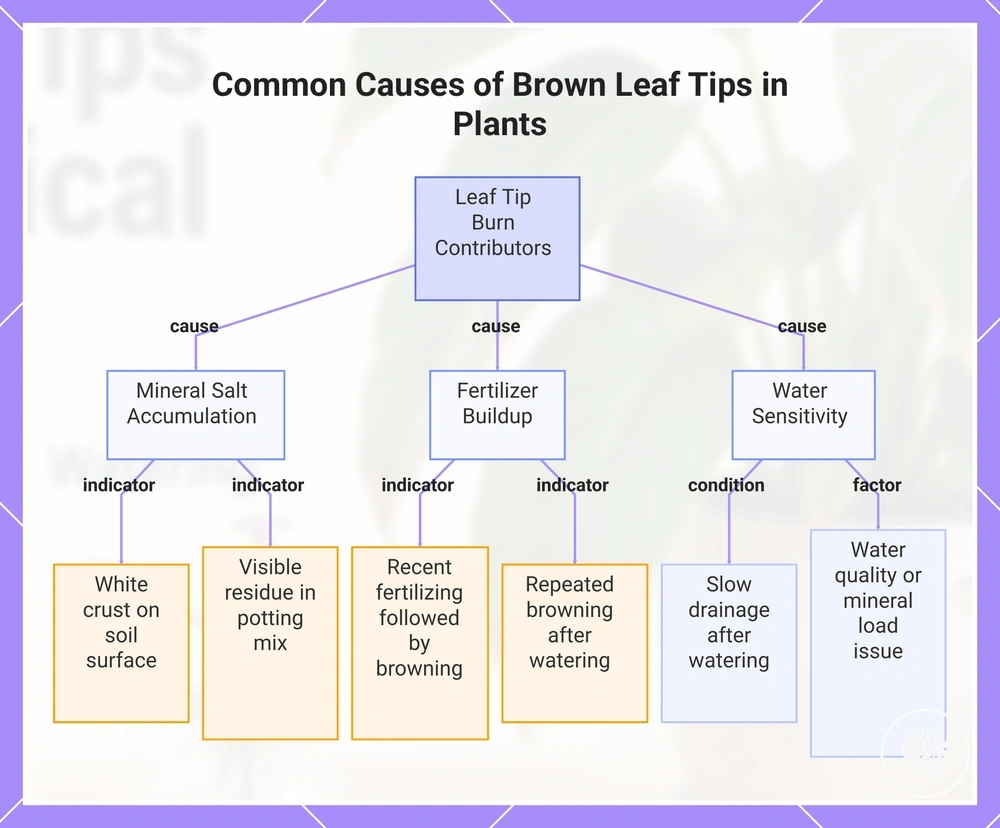
Mineral salts, fertilizer buildup, and water sensitivity
When brown leaf tips appear repeatedly, mineral salts, fertilizer buildup, or water sensitivity may be contributing to leaf-tip burn. Dissolved minerals and fertilizer salts can accumulate in the potting mix over time, and the stress may become most visible at the leaf tips. Because similar symptoms can have other causes, evidence of buildup should be checked before any action is taken.
Water sensitivity can vary by plant, water source, potting mix, drainage conditions, and overall mineral load. When salt accumulation develops in the growing medium, especially where slow drainage is present, repeated browning after watering may suggest a water quality issue or fertilizer buildup. These clues are most useful when considered together rather than as a stand-alone symptom.
These cause-and-check cues can help separate common signs of mineral buildup:
- White crust on the soil surface or pot edge — may suggest salt accumulation in the potting mix
- Recent fertilizing followed by repeated browning — may suggest fertilizer buildup
- Slow drainage after watering — may allow mineral salts to remain concentrated in the root zone
- Repeated browning after watering — may indicate an ongoing mineral load or water quality issue
- Visible residue in the potting mix — may point to dissolved minerals accumulating over time
This chart shows three common contributors to brown leaf tip burn and the signs that help identify each cause.
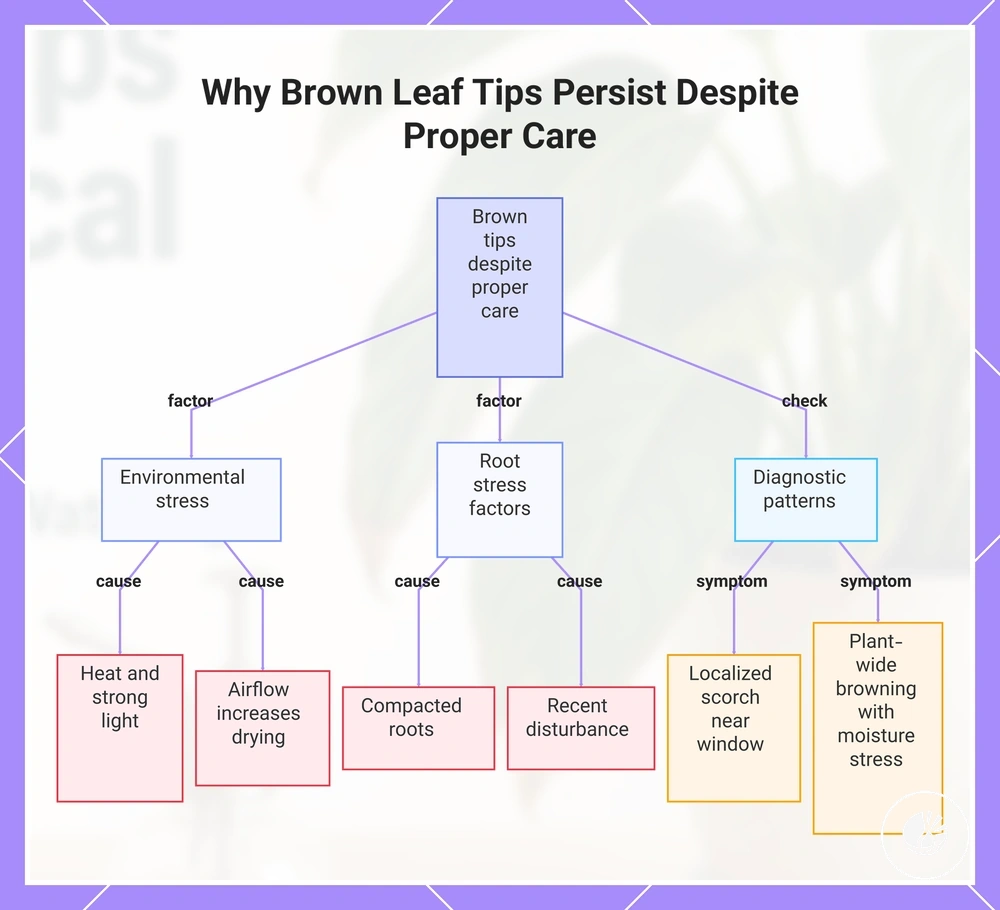
Heat, light, airflow, and root stress
When brown leaf tips continue even though primary care variables appear acceptable, heat exposure, strong light, airflow, or root stress may be contributing factors. These conditions can alter leaf water balance or reduce water uptake, making brown tips more noticeable. In many cases, they act as stress amplifiers rather than isolated explanations.
A localized scorch pattern near a bright window may differ from plant-wide tip browning linked to moisture stress or root stress. Check whether the plant has experienced recent changes in location, stronger light exposure, moving air, compacted roots, or recent disturbance. These clues can help explain why brown tips persist when other care conditions appear stable.
These environmental and root-zone factors are most useful when evaluated together:
- Heat exposure and strong light — may contribute to localized scorch and increased moisture demand
- Airflow and moving air — may increase drying around the leaf edge
- Compacted roots — may reduce normal water uptake from the root zone
- Recent disturbance — may temporarily affect root function and leaf water balance
- Plant-wide browning with moisture stress — may point toward broader root stress rather than localized light exposure
This chart explains the environmental and root stress factors that contribute to persistent brown leaf tips and shows how to distinguish between localized and plant-wide symptoms.
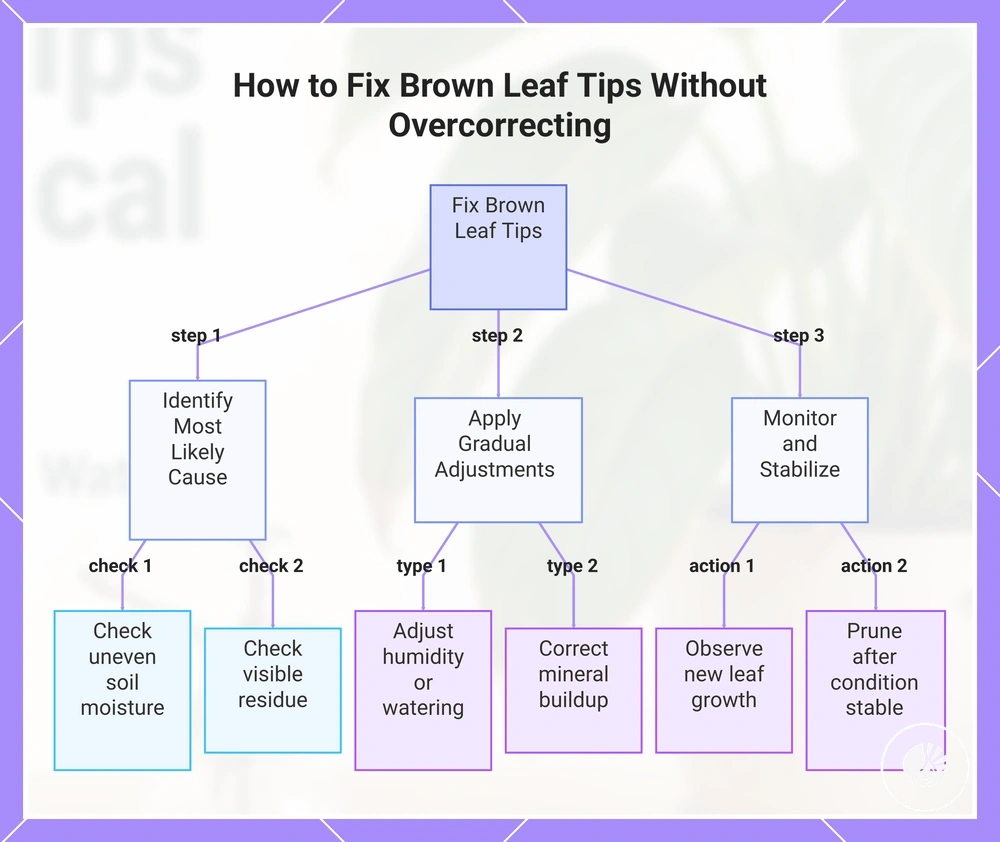
How to Fix Brown Leaf Tips Without Overcorrecting Care
Fix brown leaf tips by identifying the most likely cause before changing the care routine. Multiple care changes made at the same time can make diagnosis more difficult and may create additional stress for indoor tropical plants. A gradual correction approach helps keep conditions stable while narrowing down the cause.
Fixes should follow the strongest available evidence rather than assumptions. Humidity adjustment, watering adjustment, buildup correction, and pruning should be applied according to the symptoms observed. Use the steps below to make gradual corrections and observe new growth before introducing additional changes.
- Begin with diagnosis. If brown tips appear alongside dry air, uneven soil moisture, or visible residue, identify the most likely cause and observe whether the pattern is localized or spread across the plant.
- Use a humidity adjustment when dry-air clues appear strongest. After the adjustment, observe new growth and watch for changes in newly developing leaf tips.
- Apply a watering adjustment when soil moisture patterns suggest inconsistent watering. Stabilize the routine and observe whether new growth develops under more consistent conditions.
- Consider buildup correction only if evidence such as white crust, repeated browning after watering, or visible residue suggests accumulated mineral salts or fertilizer buildup. Observe whether the pattern continues before making further changes.
- Use pruning when damaged tissue remains brown and the underlying condition appears more stable. Trim affected tissue carefully and observe new growth rather than relying on older leaves as the recovery signal.
- Maintain a stable care routine after each adjustment. If new growth appears healthier under a stable condition, continue the gradual correction instead of changing multiple variables at once.
This chart shows the step-by-step process for fixing brown leaf tips by first identifying the most likely cause, then applying gradual adjustments, and monitoring new growth.
Stabilize humidity and watering before changing everything
Stabilize humidity and soil moisture from observed conditions before making broader care changes. Brown leaf tips often become harder to diagnose when multiple variables are adjusted at once, so start with one-variable adjustment and keep other conditions stable.
Observation should come before the next change. Use humidity clues, soil moisture checks, watering interval patterns, pot drainage, and room exposure to guide adjustments, then monitor new growth before changing another variable. If dry-air conditions appear to be contributing, review humidity and airflow causes.
Use these criteria to separate humidity and watering adjustment decisions, and compare common watering causes when soil moisture patterns remain inconsistent:
- Check room exposure and humidity conditions. If leaves are exposed to dry air or moving air, stabilize humidity first and observe new growth before making another change.
- Perform a soil moisture check. If soil moisture appears inconsistent, adjust the watering interval gradually rather than switching to a fixed schedule.
- Review pot drainage and pot weight. If drainage seems limited or the container remains unusually heavy or light for extended periods, stabilize care and observe the response before adjusting humidity.
- Change only one variable at a time. For example, make a humidity adjustment, then observe new growth before altering the watering interval.
- Use the next change only when observed conditions continue to point toward the same cause after the initial adjustment.
Flush buildup only when salts or fertilizer are likely
Flush buildup only when salts, fertilizer accumulation, or mineral residue are the most likely explanation for brown leaf tips. Visible residue, fertilizing frequency, water hardness, and recurring signs of salt buildup can provide the evidence threshold for considering a flush buildup correction.
Flushing may add unnecessary stress when a plant is weak, growing in waterlogged soil, recently repotted, or showing signs that do not clearly point to salts or fertilizer. In these situations, a pause fertilizer approach, a review of water hardness, or closer observation of plant sensitivity may be a lower-risk correction than immediate flushing.
Use these decision criteria before taking action:
- If visible residue appears on the soil surface or pot edge and drainage quality is adequate, flush buildup may help leach salts from the growing medium. Observe whether new leaf tips continue to brown before repeating the correction.
- If fertilizer has been applied frequently and brown tips continue to appear, consider a pause fertilizer period first. Observe plant response before deciding whether additional buildup correction is necessary.
- If water hardness appears to be contributing to mineral residue, consider adjusting the water source before flushing. This may be a lower-stress option for plants with higher plant sensitivity.
- If drainage quality is poor, the soil remains waterlogged, or the plant appears weak, avoid flushing until those conditions are addressed. Additional water may increase stress rather than correct the underlying issue.
- If evidence for salt buildup remains unclear, make one correction at a time and observe new growth before introducing another change.
Trim brown tips without cutting healthy leaf tissue
Trim brown tips to improve appearance when the damaged area is dry and no longer changing. Trimming does not address the underlying cause of brown leaf tips, so appearance should remain separate from the condition that created the damage.
Trimming is most appropriate when dead tissue shows stable damage and is clearly separated from healthy leaf tissue. If damage appears to be spreading, focus on the underlying care issue first. Caution: Cutting into green tissue can create a new brown edge, so trimming should follow the green-brown boundary and preserve the natural leaf shape as much as possible.
Use these steps before making a cut, and include the practice in routine maintenance checks when needed:
- Use clean scissors before trimming to reduce unnecessary damage to surrounding tissue.
- Identify the dead tissue and locate the green-brown boundary before making any cut.
- Trim brown tips by removing only the dry brown tissue and preserving healthy leaf tissue.
- Follow the natural leaf shape when you cut dry tips so the remaining edge appears more even.
- If stable damage is present, remove brown tissue as needed. If spreading damage is present, limit trimming and address the likely cause before making additional cuts.
When Brown Tips Can Recover, Stay Stable, or Spread
Brown tips recover only in the sense that the plant may produce healthier new growth after a care correction. Old damaged tissue usually remains brown, while new leaves may improve if the underlying cause has been reduced. The most useful comparison is old damaged tissue versus new growth.
Outcome signals should be evaluated through timing, spread rate, and the number of affected leaves rather than expecting a specific result after one change. Use the comparison below to determine whether damaged tips appear to stay stable, improve through new growth, or continue browning across the plant.
| Scenario | What may be happening | What to observe |
|---|---|---|
| Old damage stays stable | Old tissue remains brown, but the damage does not appear to spread | Observe whether affected tips remain unchanged after a care correction |
| New leaves improve | New growth may develop with fewer damaged tips | Compare new leaves with older damaged tissue over time |
| Brown tips spread | The underlying issue may still be active or may involve a wider problem | Watch for continue browning, increasing spread rate, or multiple leaves becoming affected |
If spreading tips continue to affect multiple leaves despite a care correction, broader troubleshooting indoor plant problems may be needed before making additional changes.
Care Checks and Tools That Help Confirm the Cause
Care checks help confirm the cause of brown leaf tips before changes are made to the routine. Humidity, soil moisture, water quality, and visible leaf condition should be verified through observation and simple measurement before action.
Tools can support observation, but they should not replace plant observation. A measurement is useful when it adds a decision signal that helps diagnose a likely cause, while routine evidence and visible leaf condition may already provide enough context.
Use the following criteria during routine maintenance checks to verify conditions before making a care correction:
| Care factor | Attribute or check | Observed condition | Decision signal |
|---|---|---|---|
| Humidity | Humidity check or measurement | Dry room conditions or airflow exposure | Verify whether dry air may be contributing to brown tips |
| Soil moisture | Soil moisture check | Soil remains very dry or very wet for extended periods | Diagnose whether watering imbalance may be involved |
| Water quality | Water source and residue check | Visible mineral residue or recurring buildup signs | Verify whether water quality may be contributing to the cause |
| Visible leaf condition | Leaf observation | Stable damage, new growth, or spreading browning | Determine whether the issue appears to be improving, staying stable, or spreading |
| Routine evidence | Review recent care changes | Patterns linked to watering, feeding, or placement | Confirm the most likely cause before changing additional variables |
Humidity, soil moisture, and water-quality checks
Humidity, soil moisture, and water quality checks help narrow the likely cause of brown tips before a care adjustment is made. A humidity check, soil moisture review, and water-quality assessment should be considered together because each check provides a different clue about possible stress conditions.
Combined evidence is usually more useful than a single reading. For example, if a humidity check suggests dry air and the visible leaf condition shows crispy brown tips on exposed leaves, both observations may point toward the same likely cause before reviewing humidity and airflow causes.
Use this checklist to verify conditions before adjusting care and to compare possible watering causes when moisture-related symptoms are present:
- Perform a humidity check and compare room humidity with signs of dry air around affected leaves.
- Check soil moisture depth instead of relying only on the appearance of the soil surface.
- Observe drainage behavior after watering to determine whether moisture remains in the root zone longer than expected.
- Review the water source and look for mineral residue on the soil surface, pot edge, or growing medium.
- Consider whether recent fertilizer use coincides with recurring brown tips or a visible mineral residue pattern.
Leaf sprays and shine products as support, not a cure
Leaf sprays and shine products may support leaf appearance, but they are not a cure for brown tips. Brown-tip correction depends on identifying the underlying care condition, while leaf surface care should remain separate from diagnosing humidity, watering, and water quality issues, making cosmetic support distinct from cause correction.
Leaf sprays, leaf care spray products, cleaning products, and shine products can leave residue on the leaf surface, and plant response may vary because product sensitivity differs between plants and growing conditions. Spray frequency, visible residue, and product sensitivity should be considered before application, especially when the underlying care condition has not yet been assessed.
Caution: Avoid sprays when residue is already present on the leaf surface, when product sensitivity is suspected, or when the cause of brown tips remains unclear. Assess the underlying care condition first so topical leaf care does not replace humidity, watering, or water-quality checks.