Indoor Tropical Plant Care Problem Diagnosis
Indoor Tropical Plant Care Problem Diagnosis starts by reading symptoms before applying fixes, so each visible stress signal is connected to likely causes and checked in a safe order. The useful diagnostic order is observation, confirmation, and measured action; this is symptom-led diagnosis.
Indoor tropical plant care problems can come from watering, root-zone conditions, light, humidity, temperature, airflow, pests, nutrients, or routine mistakes. A yellowing leaf, drooping stem, or weak growth pattern may point toward more than one cause, so the first response should stay conditional until the plant, soil, and room context are checked.
Observation before action keeps problem diagnosis from becoming overcorrection. For broader care context, indoor tropical plant care solutions should connect each symptom to the care variable that can be checked without changing everything at once.
The later diagnostic flow separates visible symptoms, cause groups, routine mistakes, useful checks, and escalation signals without treating one sign as proof. This keeps the page focused on indoor tropical plant care problems rather than species lists, product choices, or fixed care schedules.
The next useful move is to compare symptom patterns by plant part, visible condition, and first check before deciding whether watering, root-zone, light, humidity, pests, nutrients, or routine mistakes are the more likely direction.
Indoor Tropical Plant Symptoms and Likely Cause Patterns
When indoor tropical plant symptoms appear, the visible condition is a starting clue rather than final proof of the cause. Indoor tropical plant symptoms and likely cause patterns require confirmation before any diagnosis is treated as reliable.
Indoor Tropical Plant Symptoms and Likely Cause Patterns are easier to interpret when each symptom is matched to a plant part, visible condition, likely cause range, and first check. The table below helps classify stress signals before deeper cause analysis.
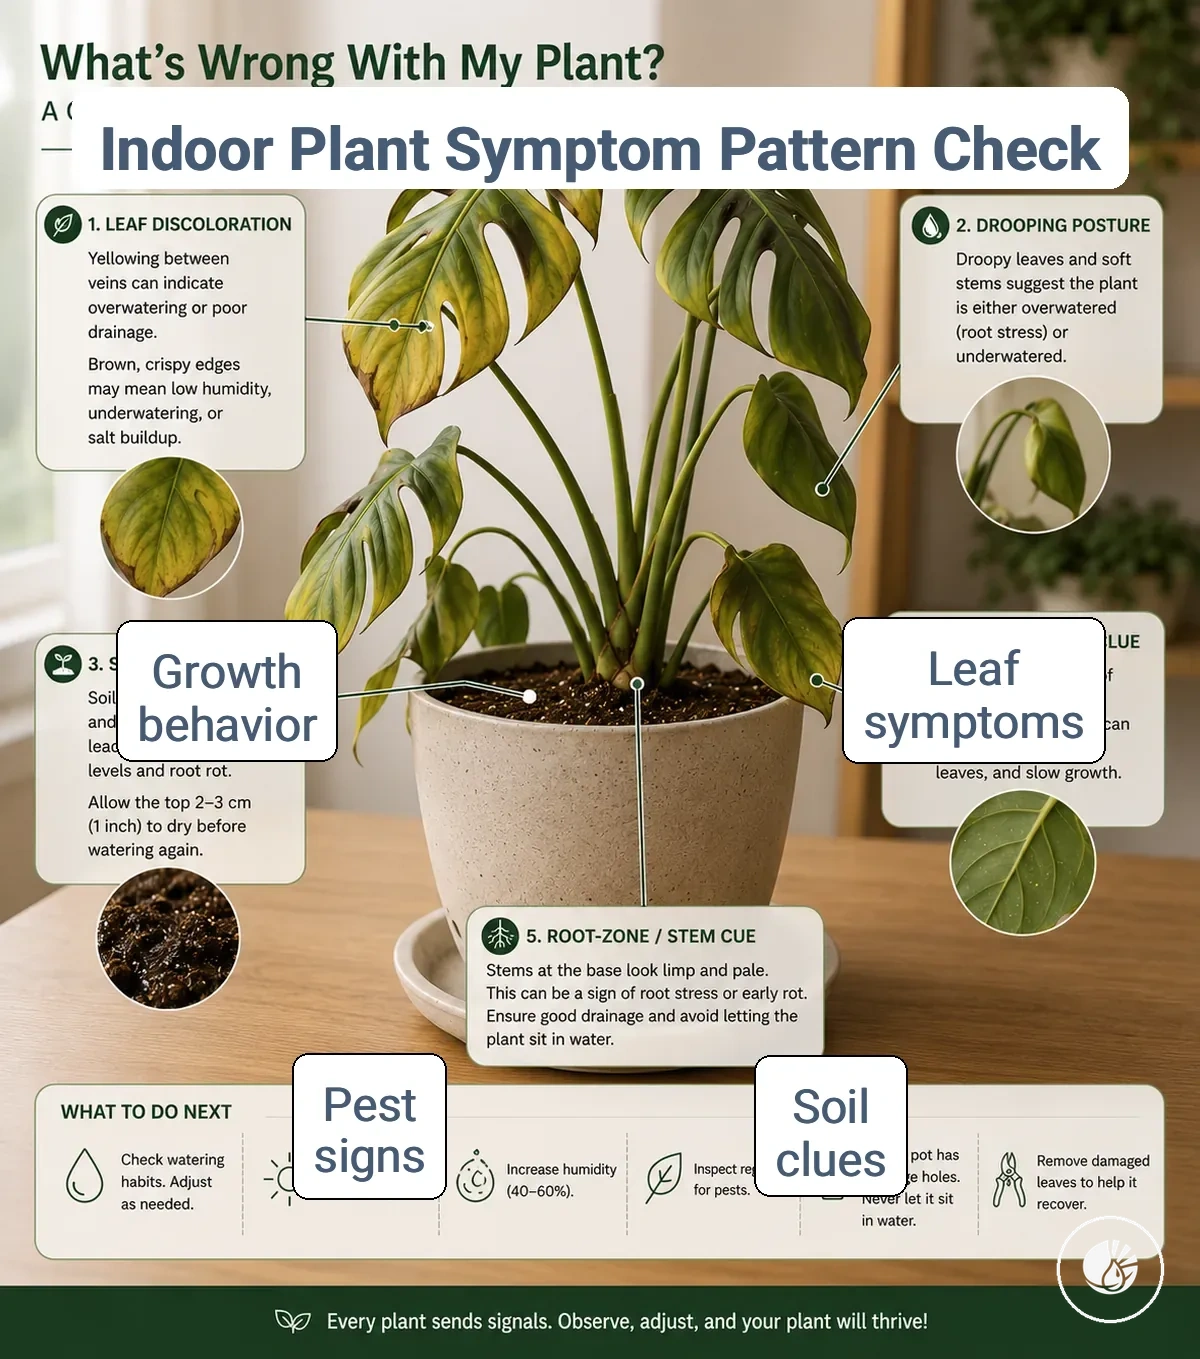
Indoor Tropical Plant Symptoms and Likely Cause Patterns become clearer when visible clues are grouped by leaves, stems, soil surface, root-zone clues, pest signs, and growth behavior. The image highlights symptom groups that should be observed before the table organizes likely cause ranges.
| Symptom pattern | Plant part | Likely cause range | First check |
|---|---|---|---|
| Yellowing leaf symptoms | Leaves | Watering imbalance, nutrient limitation, or light-related stress | Check soil moisture and leaf exposure conditions |
| Drooping posture | Leaves and stems | Root-zone stress, watering issues, or environmental change | Check soil moisture and stem firmness |
| Dry edges or browning tips | Leaves | Humidity-related stress, watering inconsistency, or root-zone conditions | Check humidity conditions and soil moisture |
| Persistent wet soil surface | Soil surface | Drainage limitations or prolonged moisture around roots | Check drainage and surface drying pattern |
| Slow growth or reduced new growth | Growth behavior | Light limitations, nutrient issues, or root-zone restriction | Check growth environment and root-space conditions |
| Webbing, residue, or distorted growth | Leaves and stems | Pest signs or stress affecting new growth | Check leaf surfaces, stems, and hidden areas for confirmation |
| Unpleasant odor or persistent decline | Root-zone clues | Root-zone stress or prolonged moisture imbalance | Check root-zone clues and soil condition |
Similar symptoms can overlap across watering, light, humidity, pests, and nutrient-related conditions, so a symptom pattern should not be treated as a final diagnosis. Use the first check to gather confirmation before deciding on a next action. This approach keeps attention on symptom classification rather than immediate fixes.
Leaf color, edge, and texture symptoms
When leaf color, leaf edge, or texture changes appear, the visible symptom is a clue rather than a fixed diagnosis. Yellowing, browning, crisp edges, curling, and faded leaves can suggest different likely condition ranges and should be confirmed before conclusions are made.
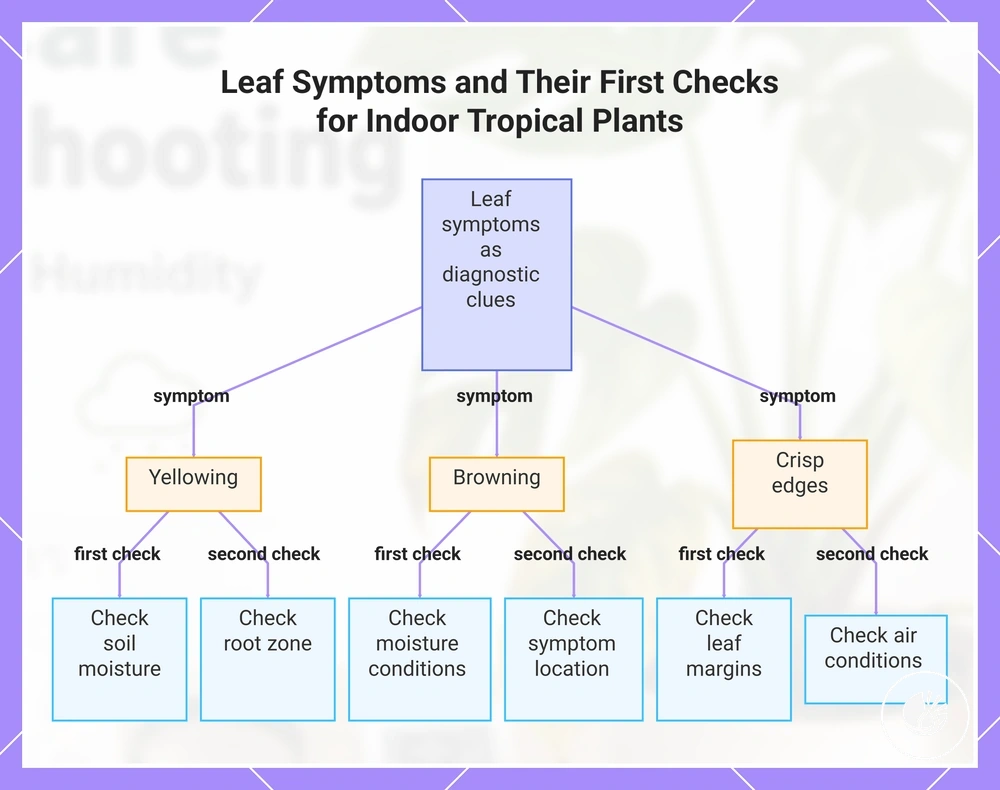
Use leaf symptoms as diagnostic clues by matching the foliage change to a likely condition and a first confirming check. More focused examples for yellow leaves on indoor tropical plants can help clarify overlapping symptom patterns.
- Yellowing may point to watering imbalance, nutrient-related stress, or root concerns; first check soil moisture and root-zone conditions.
- Browning can suggest water stress, root stress, or environmental exposure; first check moisture conditions and where symptoms appear.
- Crisp edges are more consistent with humidity stress, dryness, or accumulated stress factors; first check leaf margins and surrounding air conditions.
- Soft spots may indicate prolonged moisture exposure or root-zone issues; first check soil condition and affected tissue texture.
- Curling can suggest heat, dryness, pests, or water stress; first check for pest signs and recent environmental changes.
- Faded leaves may point to light exposure imbalance or ongoing stress; first check leaf position relative to available light.
- brown leaf tips can be an example where water stress and humidity stress overlap; first check whether the symptom is limited to the tips or affects larger leaf areas.
This chart shows three common leaf symptoms and the two primary first checks for each, based on the source text.
Drooping, wilting, leaf drop, and weak growth
When drooping, wilting, leaf drop, or weak growth appears, the posture symptom can narrow likely stress categories but still needs soil moisture, root-zone, and recent care changes checked first. A limp plant may be reacting to watering stress, heat, placement change, low light, nutrients, or root pressure rather than one fixed cause.
Drooping, wilting, leaf drop, and weak growth should be read through posture, leaf retention, new growth, soil moisture, and recent care changes. For a narrower follow-up on drooping or wilting plants, use the checks below before moving into deeper cause-specific diagnosis.
- Drooping with heavy or damp soil may indicate root-zone stress or overwatering pressure; first observe soil moisture and pot weight.
- Wilting with dry soil may suggest underwatering or heat stress; first check soil feel and recent temperature exposure.
- Leaf drop after a placement change can point to adjustment stress, light change, or routine disruption; first check what changed recently.
- Stalled growth may relate to low light, nutrients, season, or root restriction; first compare new growth with room conditions.
- Stretched growth can suggest low light or uneven exposure; first check growth direction and distance from the light source.
Sudden collapse deserves faster checking because a sharp posture change may point to acute water, heat, or root-zone stress. Gradual decline usually needs a slower comparison of soil moisture, leaf retention, weak new growth, and recent care changes before any correction is chosen.
Soil, stem, root-zone, and pest warning signs
When leaf symptoms do not clearly identify the cause, soil, stem, root-zone, and pest warning signs help confirm whether the problem is below the surface or connected to pests. These warning signs change diagnostic direction because they provide observable evidence beyond foliage appearance.
Use the signs below to compare what is visible, where it appears, and what it may indicate before moving into deeper diagnosis.
- Soil smell from a persistently wet mix may indicate root stress or poor root-zone conditions; check whether moisture remains trapped for extended periods.
- Mold on the soil surface can be a soil surface clue; if it is limited to the surface, it may differ from signs that also include root-zone decline or stem damage.
- A mushy stem is a visible warning sign; soft tissue may indicate moisture-related stress and can justify closer root-zone inspection.
- Loose roots or unusual plant movement in the pot may suggest root-zone issues; check whether the root area feels stable and supports normal growth.
- Webbing is observable pest evidence; inspect leaf joints, stems, and sheltered areas to determine whether active pests may be present.
- Sticky residue can suggest pest activity when it appears alongside other warning signs; residue without other pest evidence may require further observation before conclusions are made.
- Visible insects increase diagnostic urgency and may support isolation until identification is clearer. When multiple pest signs appear together, the next context is often indoor tropical plant pests rather than root-zone inspection alone.
Watering and Root-Zone Problems
When indoor tropical plants decline, watering problems should be checked together with root-zone conditions because similar symptoms may come from different moisture and root responses. Soil moisture, drainage, root oxygen, watering frequency, and plant response work as connected signals, so a wet or dry surface alone does not reliably identify the cause.
Soil moisture changes symptom interpretation only when drainage and root-zone conditions are considered at the same time. A pot with poor drainage, a compacted mix, limited root oxygen, or an unsuitable pot size may contribute to root stress even when watering frequency seems reasonable, while a faster-draining mix may change how quickly soil moisture declines and how the plant responds.
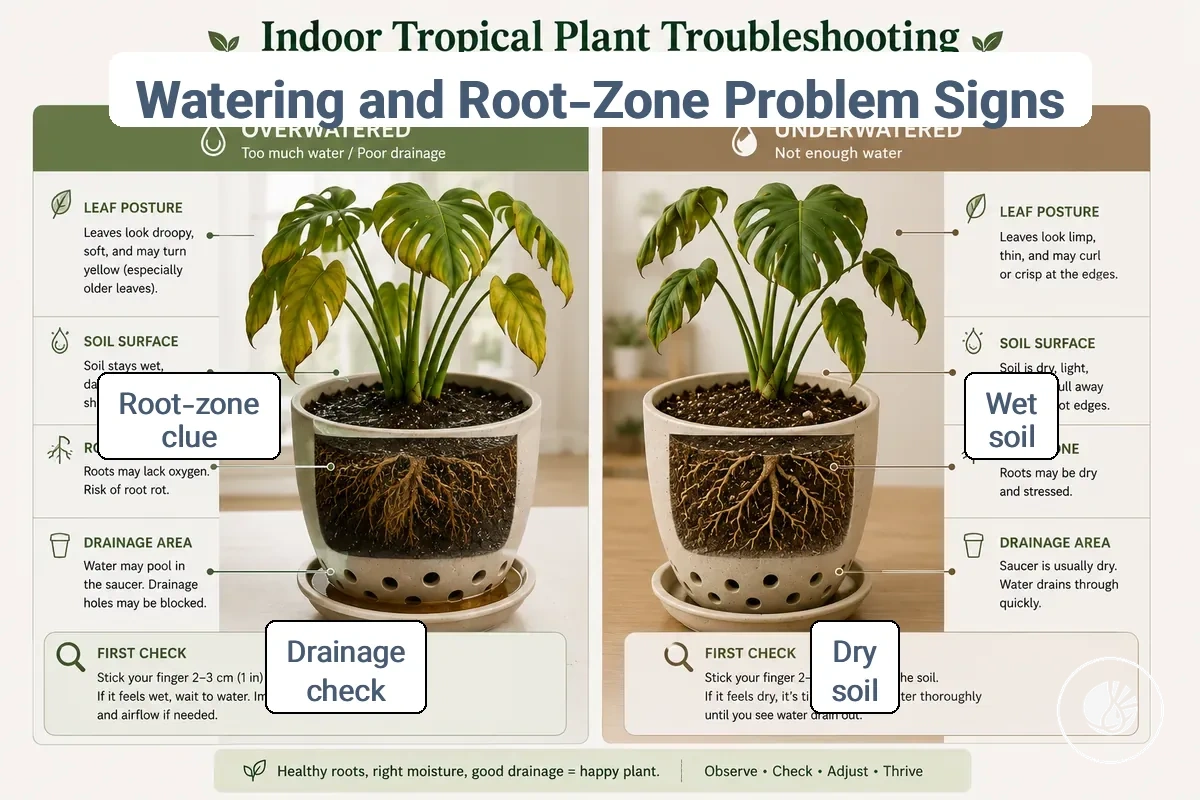
Watering and Root-Zone Problems are easier to diagnose when soil and plant signals are compared before conclusions are made. The image compares moisture and root-zone clues, while the table separates the first checks that help distinguish overwatering from underwatering.
| Condition | Common clues | First check | What to change carefully |
|---|---|---|---|
| Overwatering | Wet soil, yellow leaves, soft stems, slow plant response | Check soil moisture, drainage, and root-zone condition | Adjust watering frequency only after confirming that drainage or root oxygen limitations may be contributing to stress |
| Underwatering | Dry soil, crisp leaves, drooping growth, delayed plant response | Check soil moisture, pot weight, and drying pattern | Adjust watering frequency gradually after confirming that the root-zone is able to take up moisture effectively |
When symptoms overlap, avoid changing multiple variables at once. A moisture check may support a watering adjustment, while persistent stress despite reasonable soil moisture may justify root inspection before additional changes are made.
Overwatering and underwatering indicators
Overwatering and underwatering indicators can overlap because both conditions may lead to drooping and other signs of water stress. The most useful distinction comes from comparing soil feel, leaf texture, drooping timing, pot weight, and recovery pattern rather than treating a single symptom as proof of one condition.
Use the comparison below as a conditional guide. Overwatering and underwatering indicators should be interpreted together because wet soil, dry soil, drainage conditions, and root-zone context can change what each clue may indicate.
| Indicator | Overwatering | Underwatering |
|---|---|---|
| Soil feel | Wet soil may suggest too much water when moisture remains elevated. | Dry soil may suggest too little water when moisture remains limited. |
| Leaf texture | Leaves may feel softer when excess moisture is contributing to water stress. | Leaves may become crisper when moisture availability is reduced. |
| Drooping timing | Drooping may appear while soil still feels wet. | Drooping may appear when dry soil and moisture loss occur together. |
| Pot weight | A heavier pot may indicate retained moisture, though drainage can affect interpretation. | A lighter pot may indicate lower moisture levels when confirmed by a moisture check. |
| Recovery pattern | Recovery may be slower when root-zone stress is involved. | Plant response may improve more quickly when moisture imbalance is the primary factor. |
A plant that droops in both wet soil and dry soil requires additional context rather than an immediate conclusion. Comparing soil feel, pot weight, leaf texture, and drooping timing can help separate overwatering from underwatering when symptoms appear similar.
Wet soil, compacted mix, drainage, and root stress
Wet soil, compacted mix, drainage, and root stress should be evaluated together because wet soil and a compacted mix can change how watering symptoms are interpreted. A soggy mix may increase water retention and reduce root oxygen when slow drying persists, so root-zone conditions should be checked before assuming watering habits are the only factor.
Use the checklist below to confirm whether soil and pot conditions suggest a root-zone problem rather than a watering symptom alone.
- Standing water: Check whether water remains in the pot or drainage area after watering; standing water may limit root oxygen when it persists.
- Slow drying: Check whether wet soil stays damp longer than expected for the environment; slow drying may indicate excess water retention around roots.
- Compacted mix: Check whether the soil feels dense and restricts normal water movement; a compacted mix may contribute to root stress when oxygen access is reduced.
- Drainage holes: Check whether drainage holes are open and unobstructed; blocked drainage holes can allow moisture to remain in the root-zone longer.
- Root smell: Check for unusual odor only when root inspection is appropriate; a noticeable root smell may justify closer evaluation of root conditions.
- Root firmness: Check whether visible roots appear firm rather than weakened; changes in root firmness may suggest that root-zone conditions deserve further attention.
Recently repotted plants and plants in an oversized pot may show delayed drying because moisture retention can remain higher while root systems adjust to the available soil volume. If wet soil, slow drying, root smell, or reduced root firmness occur together, root inspection may become relevant before further watering changes are made.
Light Exposure Problems in Indoor Tropical Plants
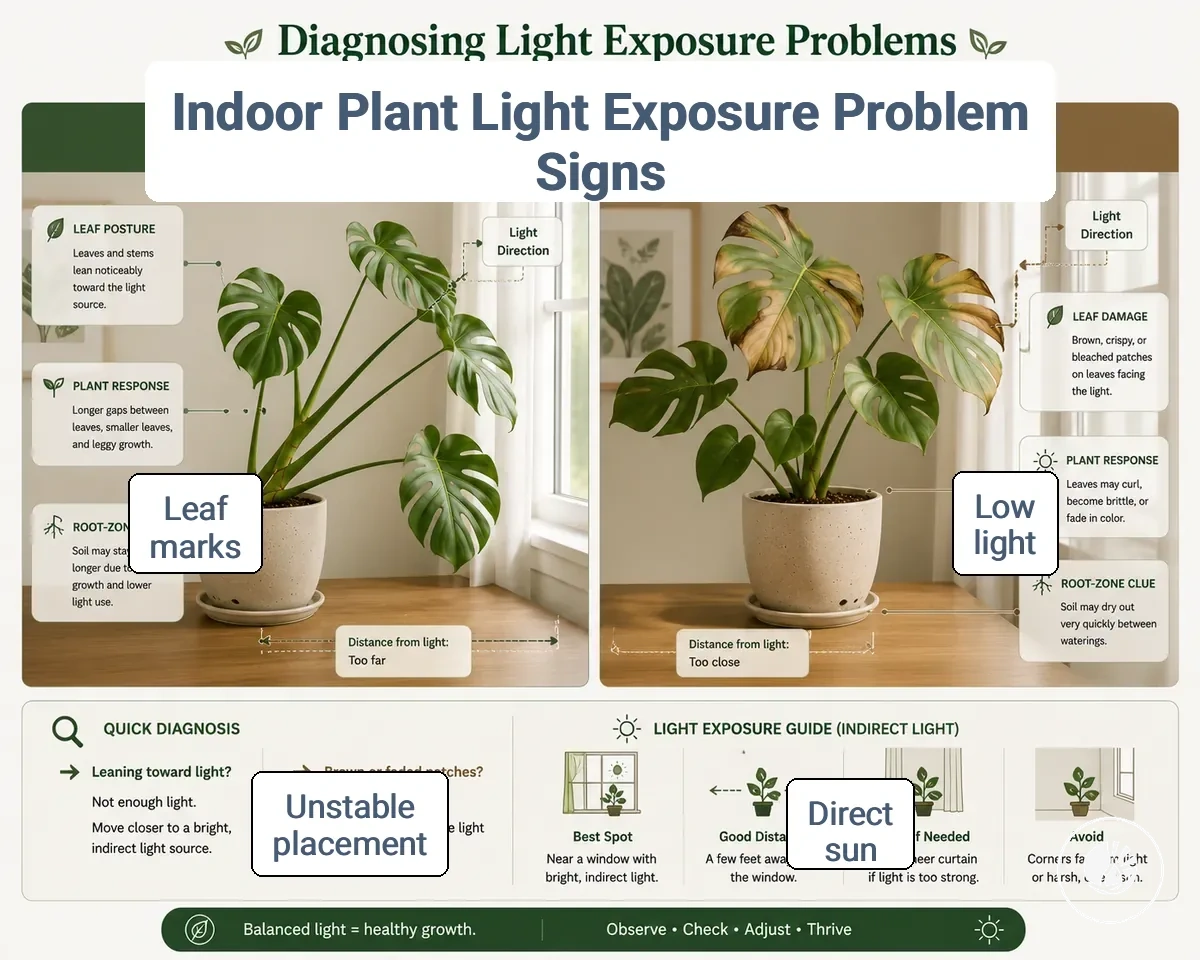
Light exposure problems in indoor tropical plants are a likely cause of decline when leaf color, growth direction, and visible leaf marks match the plant’s placement and exposure duration. A plant that leans strongly toward a window, develops leggy growth, or shows burn marks may be reacting to a light problem rather than a watering issue.
Low light and direct sun often create different symptom patterns. Low light may lead to slow decline, longer internode length, fading leaf color, and growth direction that follows the nearest light source, while direct sun can cause more acute damage such as burn marks, faded areas, or crispy patches on exposed leaves. Unstable placement can add placement stress when a plant is moved frequently between different light conditions.
Light Exposure Problems in Indoor Tropical Plants are easier to interpret when visible signs are compared with placement clues. The image below clarifies common exposure patterns before the table organizes first adjustments by condition.
| Exposure condition | Visible signs | Placement clue | First adjustment |
|---|---|---|---|
| Low light | Leggy growth, lighter leaf color, longer internode length | Plant is positioned far from a light source or receives limited light exposure | Move gradually toward a brighter location |
| Direct sun | Burn marks, faded leaves, crispy patches | Leaves receive prolonged direct sun through window placement | Reduce direct exposure and monitor new growth |
| Unstable placement | Adjustment stress, inconsistent growth direction, uneven appearance | Plant is relocated frequently or exposed to changing light conditions | Keep placement more consistent and observe response |
Low light, leggy growth, and slow decline
Low light often appears as gradual weakness rather than a sudden symptom, so low light, leggy growth, and slow decline are usually identified through changing growth patterns over time. Leggy growth, small leaves, leaning, and reduced new growth can indicate low-light stress when placement and exposure duration support the pattern.
Use the criteria below to confirm whether low light may be contributing to decline. Each sign becomes more meaningful when it is checked alongside placement, growth direction, light intensity, and access to natural light.
- Leggy growth with longer stems between leaves is a visible sign; check whether the plant is positioned far from windows or receives limited light for extended periods.
- Small leaves on newer growth can indicate reduced light intensity; check whether window distance or placement limits available light.
- Leaning toward one direction is a clear growth signal; check whether growth direction consistently follows the nearest light source.
- Slow-drying soil can occur when water use declines; check whether low light and placement conditions may be reducing active growth.
- Reduced new growth may suggest low-light stress; check whether the plant is placed behind curtains or in an area with limited exposure duration.
Direct sun, light burn, and unstable placement
Direct sun, light burn, and unstable placement can mimic dryness because exposed foliage may develop damage that resembles moisture stress. Scorched patches, faded leaves, crispy exposed leaves, and relocation stress become more useful diagnostic clues when they are evaluated alongside light intensity, leaf surface exposure, and recent placement changes.
Use the checks below to separate direct sun damage from dryness-related crisping and to identify whether unstable placement may be contributing to stress. Visible signs become more meaningful when placement history, time of day, and exposure conditions are reviewed together.
- Scorched patches on the leaf surface are a direct sign of light burn; check whether the affected area faces a window or receives stronger direct sun during part of the day, then consider a gradual exposure adjustment.
- Faded leaves may indicate sun damage when discoloration appears mainly on exposed leaf surfaces; check whether light intensity increased after a placement change.
- Crispy exposed leaves can suggest direct sun when damage is concentrated on foliage receiving the strongest exposure; dryness-related crisping is more likely when no clear exposure pattern is visible.
- Relocation stress may occur after frequent movement between different light conditions; check whether visible decline began after a recent placement change.
- Uneven damage across the plant can point to exposure differences; check which leaf surfaces receive the strongest light and whether the time of day changes exposure intensity.
Plant tolerance can vary, so direct sun, light burn, and unstable placement should be interpreted alongside exposure history rather than treated as a universal response for all indoor tropical plants.
Humidity, Temperature, and Airflow Stress
When watering and light checks do not fully explain declining tropical foliage, indoor environment stress may be a likely secondary diagnosis. Humidity, temperature, and airflow can influence leaf condition together, so symptoms may persist even when soil moisture and light exposure appear reasonable.
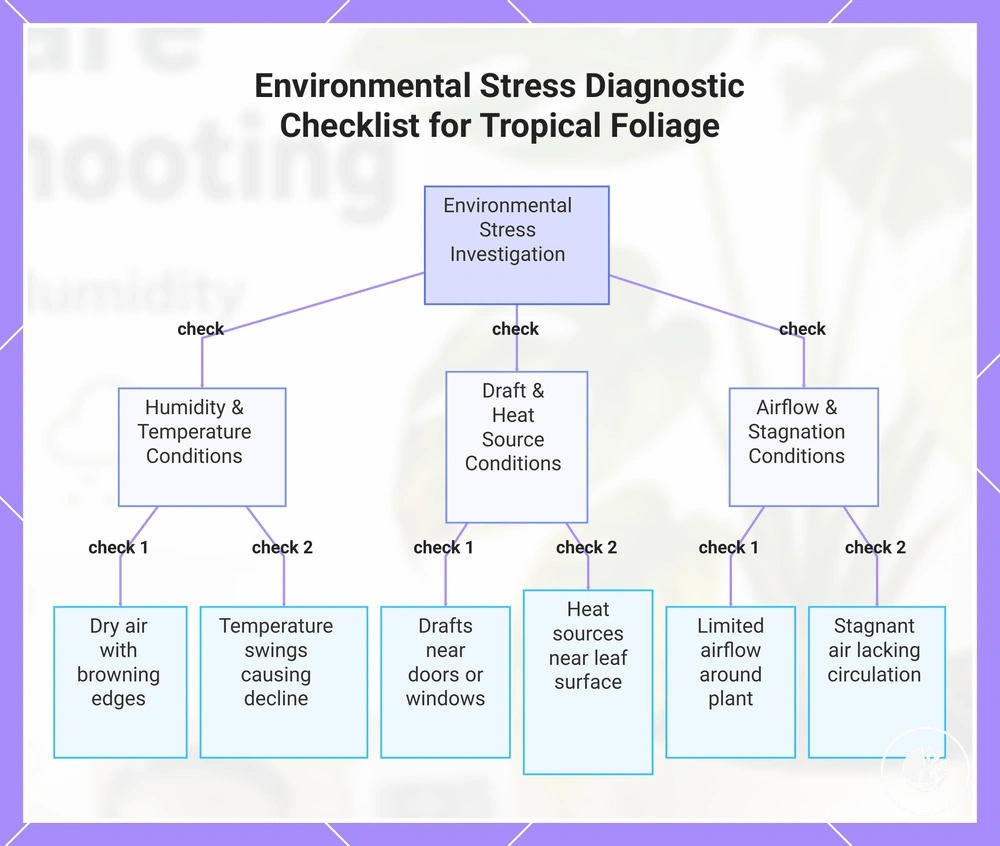
Humidity, temperature swings, drafts, heat sources, and stagnant air often affect tropical foliage through visible changes at the leaf surface. Browning leaf edges, dry-looking foliage, uneven growth, and persistent stress signals can be connected to room conditions rather than a single cause. Plant response may vary by room setup, season, and plant type, so environmental stress should be interpreted within the broader growing environment.
Environmental stress is usually worth investigating after watering and light checks leave symptoms unexplained. Use the checklist below to compare room conditions with visible foliage responses before making further adjustments.
- Humidity condition: If dry air coincides with browning leaf edges or dry-looking foliage, check whether the surrounding air feels consistently dry and consider a gradual adjustment to the growing environment.
- Temperature swing condition: If foliage decline appears after frequent temperature changes, check for recurring temperature swings and reduce sudden exposure where possible.
- Draft condition: If leaves show stress near doors, windows, or vents, check for noticeable drafts and consider a more stable placement.
- Heat source condition: If tropical foliage appears stressed near heat sources, check whether concentrated heat is reaching the leaf surface and increase separation when appropriate.
- Airflow condition: If foliage remains stressed despite reasonable watering and light conditions, check whether airflow is limited and whether air movement around the plant is minimal.
- Stagnant air condition: If stagnant air coincides with dull foliage or persistent surface issues, check whether the growing area lacks air circulation and consider improving overall air movement.
This chart shows the environmental conditions to check when watering and light checks leave symptoms unexplained.
Low humidity symptoms on tropical foliage
Low humidity can stress tropical foliage when visible dryness appears on leaf surfaces even though normal watering and soil moisture checks seem reasonable. Crispy edges, brown tips, curled leaves, and slow unfurling may point to humidity stress when room dryness and symptom recurrence support that direction.
Use the checklist below to separate low humidity from underwatering. If soil moisture is normal but foliage dryness keeps returning, dry air may be a stronger diagnostic clue than watering alone.
- Crispy edges: Check whether leaf margins feel dry while soil moisture remains reasonable; repeated edge dryness may indicate low humidity exposure.
- Brown tips: Check whether brown tips appear across newer and older foliage without consistently dry soil; this can suggest room dryness as a contributing factor.
- Curling leaves: Check whether curled leaves appear during dry indoor conditions; curling may reflect humidity stress when watering checks do not explain the pattern.
- Slow unfurling: Check whether new leaves open slowly or unevenly in a dry room; slow unfurling may be linked to low humidity around developing tropical foliage.
- Repeated dryness despite normal watering: Check whether foliage symptoms recur after soil moisture has been verified; recurring dryness may support a humidity-related diagnosis.
Cold exposure, heat stress, and stagnant air
Cold exposure, heat stress, and stagnant air depend on temperature stability and airflow movement around the plant. Drafts, AC exposure, radiator heat, hot windows, and still air may contribute to plant stress when room location repeatedly exposes tropical foliage to changing environmental conditions.
Use the checks below to compare room conditions with visible plant signals. Each condition should be interpreted alongside plant response and the consistency of exposure.
- Drafts: A cold draft is a direct room condition; if leaf stress appears near doors or windows, repeated draft exposure may be contributing to the pattern.
- AC exposure: AC exposure creates concentrated airflow movement; if foliage is positioned in the direct path of cooled air, plant response may reflect ongoing cold exposure.
- Radiator heat: Radiator heat is a localized heat source; if leaves closest to the heater show stress first, heat stress may be a contributing factor.
- Hot windows: Hot windows create concentrated warmth on exposed foliage; if stress is strongest on the window-facing side, heat exposure may help explain the pattern.
- Night drops: Sudden night drops are a form of temperature swing; if leaf stress follows cooler nighttime conditions, temperature instability may be involved.
- Stagnant air: Still air is easy to observe in enclosed growing areas; if stagnant air coincides with persistent foliage issues, limited airflow movement may be part of the diagnosis.
Temporary stress after a room change may ease as conditions stabilize, while ongoing environmental pressure is more likely when the same room-condition signals continue to recur.
Pests, Disease, and Nutrient Issues That Resemble Care Mistakes
When leaf damage, discoloration, or weak growth continues despite reasonable care, pests, disease, or nutrient imbalance may be contributing to the problem rather than watering, light, or humidity mistakes alone. Symptom overlap is a common cause of misdiagnosis, so visible clues should be checked before changing care routines.
Pests, disease, and nutrient issues often share visual signs with care mistakes. Insects, webbing, sticky residue, leaf spots, distorted growth, pale leaves, fertilizer history, and soil condition can help separate a pest sign, disease suspicion, or nutrient imbalance from a simple environmental stress response.
Pests, Disease, and Nutrient Issues That Resemble Care Mistakes are easier to identify when overlapping signs are compared with confirming clues. Use the table below to decide when inspection, isolation, or narrower follow-up may be appropriate.
| Sign | Could resemble | Confirming clue | Next safe action |
|---|---|---|---|
| Visible insects, webbing, or sticky residue | Humidity or watering stress | Direct observation of pest signs during inspection | Inspect nearby foliage and consider isolation if pest evidence is clear |
| Leaf spots | Light damage or environmental stress | Disease-like spots that persist or spread may justify closer inspection | Monitor affected foliage and inspect surrounding leaves |
| Distorted growth | Low light or placement stress | New growth appears abnormal alongside other warning signs | Inspect growing points and compare with recent care changes |
| Pale leaves | Low light exposure | Fertilizer history and soil condition may suggest a nutrient imbalance | Review fertilizer history and inspect overall plant condition |
If inspection confirms insects, webbing, or sticky residue, a narrower follow-up on indoor tropical plant pests may help separate pest evidence from care mistakes more accurately.
Visible insects, webbing, spots, and distorted growth
When visible insects, webbing, spots, or distorted growth appear on a plant surface, routine watering, light, or humidity correction should pause until inspection confirms whether active pest evidence or a disease-related issue may be involved. These visible clues change the diagnostic workflow because they provide direct evidence that can be more specific than general stress symptoms.
Focus inspection on locations where active signs are easiest to confirm. The checklist below helps distinguish visible evidence from marks that may have a less specific explanation.
- Leaf undersides: Inspect leaf undersides for visible insects or webbing; direct pest evidence on the plant surface is a stronger clue than general decline alone.
- Sticky residue: Inspect leaves and nearby surfaces for sticky residue; active signs are more likely when residue appears alongside visible insects or speckling.
- Speckling: Inspect leaves for fine speckling patterns; concentrated speckling may indicate pest evidence when other visible signs are present.
- Leaf spots: Inspect the size and distribution of spots; fungal-looking spots may justify closer inspection when they persist or appear to spread.
- New leaves: Inspect new leaves for distorted growth or damaged growth; abnormal development may suggest a problem beyond routine care mistakes.
- Dust versus active signs: Inspect whether residue wipes away cleanly like dust or remains associated with webbing, sticky residue, or visible insects; this contrast can help confirm active pest signs.
Nutrient deficiency and overfertilizing clues
Nutrient deficiency and overfertilizing clues should be evaluated after immediate care conditions have been checked. Pale new growth, weak growth, leaf edge burn, or other symptom patterns may suggest a nutrient imbalance, but these signs can also overlap with root stress or incorrect watering.
Use the criteria below to compare nutrient input, fertilizer timing, soil buildup, and seasonal growth state before treating a feeding issue as the most likely explanation. Each clue is stronger when it matches the broader growth context and symptom pattern.
- Pale new growth: Pale new growth may be a nutrient deficiency clue when newer foliage appears lighter than expected; compare the pattern with recent growing conditions before drawing conclusions.
- Weak growth: Weak growth may indicate a feeding issue when development remains limited despite otherwise reasonable care; consider plant response within its seasonal growth state.
- Leaf edge burn: Visible leaf edge burn is a clear clue; when it appears alongside recent nutrient input or frequent application, overfertilizing may deserve consideration.
- Salt crust: A visible salt crust on the soil surface or container edge is direct evidence of soil buildup; use it as a caution signal rather than proof of fertilizer burn.
- Fertilizer timing: Fertilizer timing provides useful context; recent feeding combined with changing symptoms may help explain plant response, but conclusions should remain conditional.
- Seasonal growth state: Growth phase can influence nutrient demand; slower seasonal growth may change how plants respond to nutrient input and soil buildup.
Care Routine Mistakes That Intensify Plant Problems
When plant symptoms persist or worsen, care routine mistakes can make diagnosis harder by adding new stress before the original cause is confirmed. Multiple care changes at the same time create overlapping symptom patterns, making it more difficult to determine whether decline is related to watering, light, pests, root stress, or another condition.
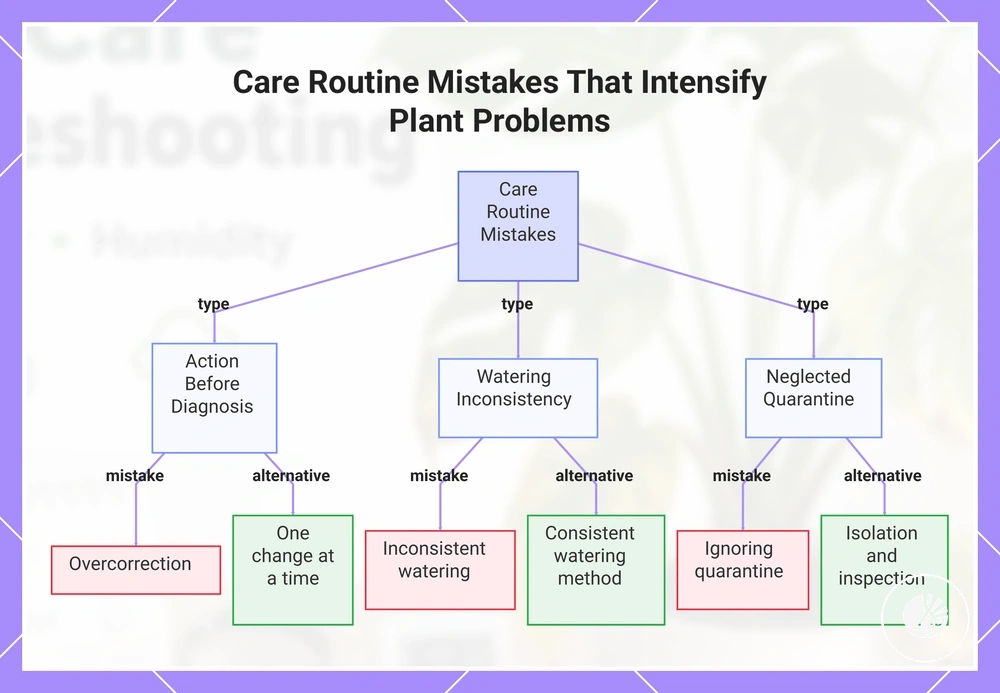
Common care routine mistakes include overcorrection, repeated relocation, inconsistent watering, fertilizing stressed plants, ignoring quarantine, and reacting before confirming cause. A routine error does not necessarily create the original problem, but it can complicate diagnosis by introducing additional stress or masking the initial symptom pattern.
A common example is yellow leaves leading to extra watering before confirming cause. If yellow leaves are followed by increased watering, root stress may develop and make the original issue harder to identify. The checklist below highlights mistake patterns that can intensify plant problems and suggests a more measured alternative.
- Overcorrection: Making multiple changes after one symptom can connect the wrong cause to the wrong response; focus on one care change at a time and monitor the result.
- Repeated relocation: Frequent movement between locations can add adjustment stress and make light-related decline harder to interpret; keep placement stable while evaluating symptoms.
- Inconsistent watering: Alternating between very dry and very wet conditions can contribute to root stress and confuse symptom patterns; maintain a more consistent approach while observing plant response.
- Fertilizing stressed plants: Adding fertilizer before confirming cause may complicate diagnosis when the problem is unrelated to nutrient input; evaluate the broader symptom pattern first.
- Ignoring quarantine: Introducing new plants without inspection can make pest-related issues harder to trace; use isolation and inspection when new plants enter the growing area.
- Reacting before confirming cause: A reaction mistake may hide the original symptom pattern; use visible evidence and context before making additional care changes.
Consistent observation and measured correction help prevent repeated diagnostic confusion. For repeatable prevention habits, review the maintenance checklist for prevention.
This chart shows common care routine mistakes that complicate plant problem diagnosis and the recommended alternative for each.
Overcorrecting water, light, fertilizer, or placement
When plant symptoms continue after a care change, overcorrecting water, light, fertilizer, or placement can create diagnostic uncertainty by introducing multiple variables at once. Rapid changes reduce diagnostic clarity because plant response may reflect the newest adjustment rather than the original cause, making it harder to determine which factor is contributing to decline.
A practical example is drooping foliage followed by extra water, relocation to a brighter location, and fertilizer application within a short period. If plant response changes afterward, diagnostic uncertainty increases because multiple changes occurred together. The examples below show common overcorrection patterns and why it is helpful to observe one variable before adjusting another.
- Water: Adding more water after drooping may contribute to overcorrection if the original cause was not dryness; observe plant response before making another water change.
- Placement: Repeated relocation combines placement changes with light change and adjustment stress, making decline harder to interpret; keep placement stable while evaluating the effect of a single change.
- Fertilizer: Applying fertilizer to a stressed plant may introduce another variable when timing does not match the underlying issue; review plant response before adding further inputs.
- Light: Changing light conditions too abruptly may create a new stress signal that overlaps with the original symptom; make measured light adjustments and observe the response before changing another variable.
Treating symptoms before confirming the cause
When plant symptoms appear, treating symptoms before confirming the cause creates a clear risk of wrong treatment because symptom-only treatment relies on an assumed cause rather than confirming evidence. Treatment should follow cause confirmation, as acting on uncertainty may contribute to active decline or make the original problem harder to identify.
Use the decision checklist below before intervention. Cosmetic damage may remain visible without indicating a current problem, while active decline involves continuing symptom development that warrants closer evaluation. Each step connects a symptom, assumed cause, confirming evidence, and the risk of wrong treatment.
- Yellowing leaves: If the assumed cause is a water issue, confirm soil moisture first; changing care without evidence increases the risk of wrong treatment.
- Weak growth: If the assumed cause is insufficient light, verify light exposure and review placement conditions; adjustment without confirmation can increase diagnostic uncertainty.
- Leaf marks or damage: If pests are suspected, inspect for pest signs before responding; assumption alone may lead attention away from the actual cause.
- Recent symptom changes: If a care mistake is suspected, review recent care changes for diagnostic evidence before intervening; missing this step can make plant response more difficult to interpret.
Tools That Help Confirm Indoor Plant Care Problems
Diagnostic tools support indoor tropical plant care decisions by helping confirm symptom evidence, but they do not diagnose problems on their own. A care decision is more reliable when tool findings are combined with observation, because confirmation depends on context rather than a single reading or inspection result.
Different diagnostic tools check different conditions. A moisture meter and pot weight can help assess soil moisture and watering patterns, a humidity meter can show room humidity conditions that may affect foliage, and a light check can help evaluate placement and exposure. Leaf inspection and sticky traps help gather pest-related evidence, while a spray bottle can support closer inspection of foliage during observation.
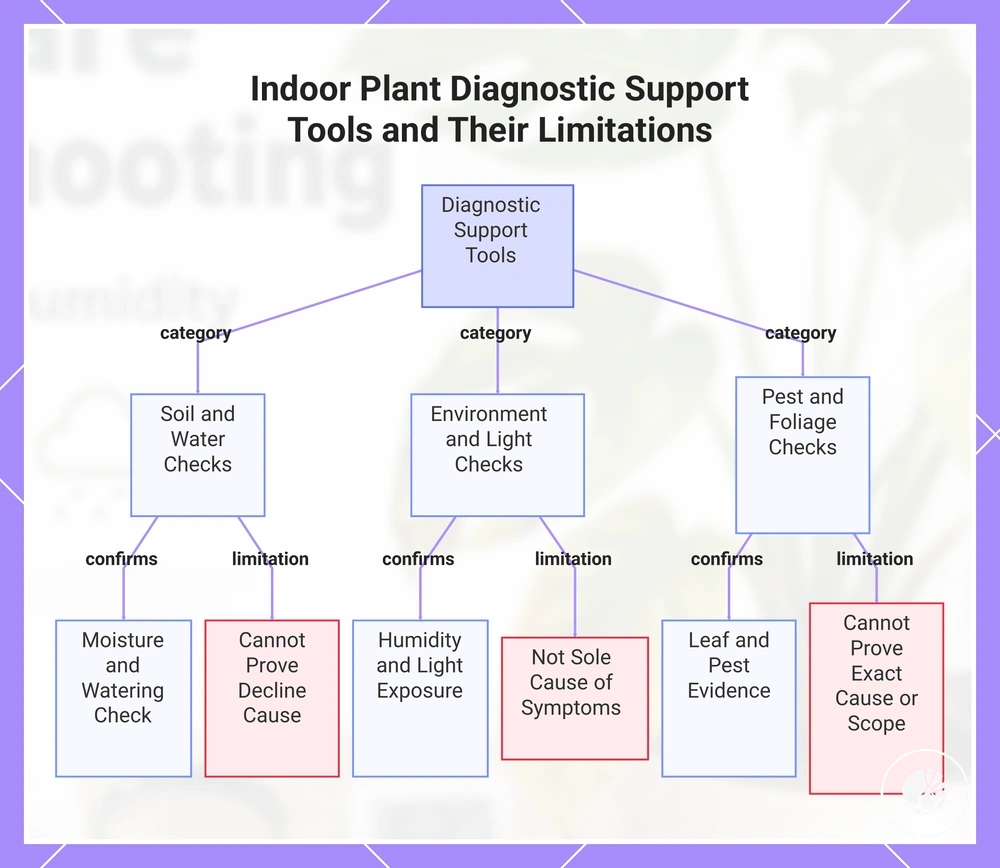
Support tools are most useful when they confirm evidence rather than replace observation. Use the checklist below to understand what each tool can confirm and what it cannot prove by itself.
- Moisture meter: Can confirm current soil moisture conditions; cannot prove the cause of plant decline or whether watering is the only factor involved.
- Humidity meter: Can confirm room humidity levels; cannot prove that dry air is the sole reason for foliage symptoms.
- Light check: Can confirm light exposure and placement conditions; cannot prove how a plant will respond without considering other diagnostic evidence.
- Leaf inspection: Can confirm visible symptom evidence such as discoloration, damage, or pest signs; cannot prove the exact cause of every symptom.
- Sticky traps: Can confirm the presence of certain pest activity when evidence is captured; cannot prove the full scope of a pest problem.
- Spray bottle: Can support inspection and observation of foliage surfaces; cannot prove that a condition has been correctly identified or resolved.
This chart shows three categories of diagnostic support tools and what each can confirm and what each cannot prove on its own.
Moisture, humidity, and light checks
Moisture, humidity, and light checks are useful criteria only when each check is matched to a visible symptom before making the next care decision. A moisture check, humidity check, or light check can confirm a care variable, but interpretation depends on timing, location, plant condition, and plant response rather than a single reading.
Use the mini-checklist below to connect each measurement check with the condition being evaluated. Readings should be interpreted cautiously because confirmation comes from matching the reading with visible symptoms. For example, if a soil moisture reading and pot weight both indicate wet soil, confirming that condition before changing the watering routine can reduce the risk of an unnecessary adjustment.
- Soil moisture reading: Measure within the root zone of the container; a wet or dry reading may support confirmation, but timing and plant condition affect interpretation.
- Pot weight: Check the container where the plant is growing; a heavier pot may support wet-soil confirmation, but the result should be compared with watering history and current symptoms.
- Room humidity: Measure near the foliage rather than elsewhere in the room; room humidity may help explain brown tips or dry-air concerns, but it should be matched to visible foliage symptoms.
- Light exposure: Check light conditions at the plant's placement location; light exposure may influence growth response, but timing and daily conditions can change how the reading is interpreted.
- Plant response: Observe new growth and overall condition after a check; plant response can help determine whether the reading is relevant to the next care decision.
Leaf inspection and pest detection checks
Leaf inspection and pest detection checks depend on visible evidence gathered from specific inspection locations rather than general plant decline alone. Close inspection helps confirm whether pest detection is supported by signs on leaf undersides, stems, or new growth, which can inform an isolation decision when the same evidence appears repeatedly.
Use the checklist below to connect inspection location with evidence quality before drawing conclusions. For example, an aging leaf that yellows and drops without sticky residue, webbing, spots, or repeated signs may reflect ordinary aging, while similar decline accompanied by repeated visible evidence across multiple plant surfaces may support early pest detection. When pest evidence is confirmed through repeated inspection, additional information about indoor tropical plant pests may help with the next evaluation step.
- Leaf undersides: Inspect leaf undersides for insects, webbing, or repeated markings; visible evidence in this location can provide stronger support for pest detection than isolated leaf damage.
- Stems: Inspect stems for sticky residue, insects, or spots; evidence that appears across multiple stem areas may justify closer evaluation.
- New growth: Inspect new growth for distortion, unusual markings, or repeated decline; changes in developing foliage may provide useful pest detection clues when other evidence is also present.
- Leaf surface evidence: Inspect the leaf surface for sticky residue, webbing, and spots; a repeated pattern across multiple leaves is usually more meaningful than a single isolated mark.
- Trap activity and isolation decision: Check trap activity alongside visible evidence from the plant; repeated trap activity combined with inspection findings may support an isolation decision while evaluation continues.
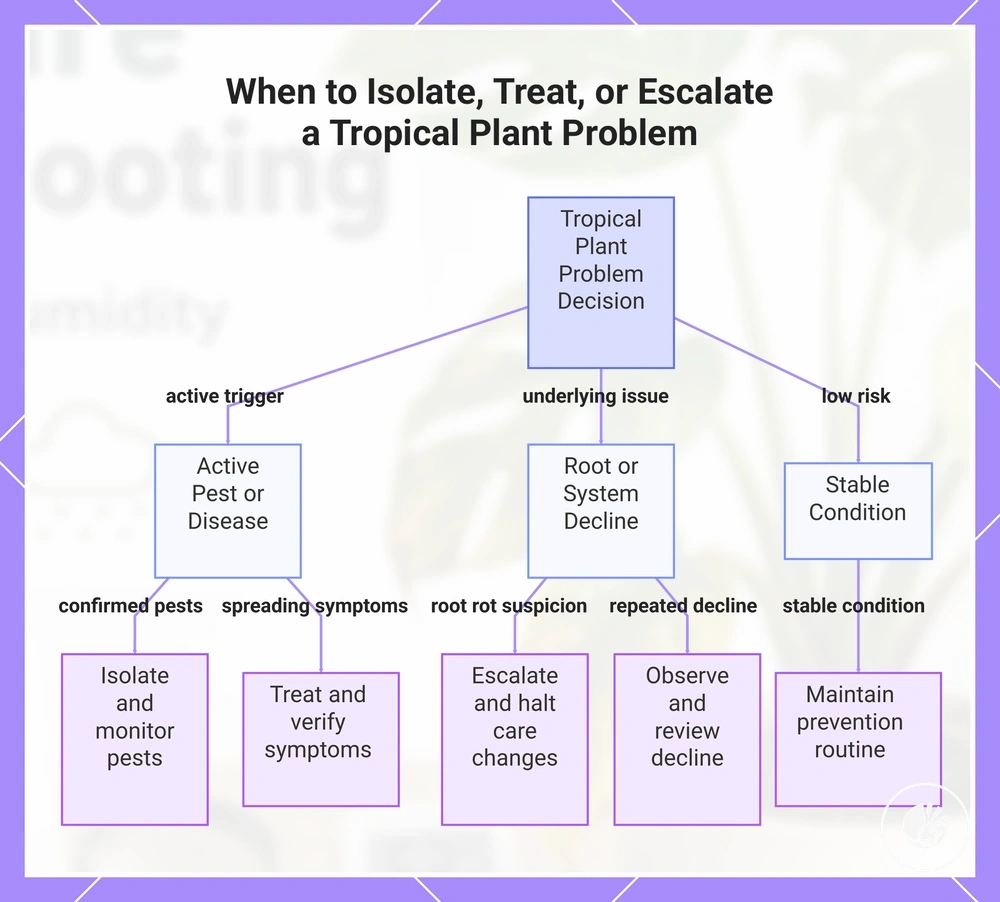
When to Isolate, Treat, or Escalate a Tropical Plant Problem
When an indoor tropical plant problem is confirmed or continues to worsen, the next safe action depends on confirmed risk and severity. Isolation, treatment, observation, or escalation should follow visible evidence and symptom progression rather than repeated care adjustments.
When to Isolate, Treat, or Escalate a Tropical Plant Problem is easier to decide when each trigger is matched to an action and a caution. Use the decision checklist below to separate situations that require monitoring from those that may justify intervention or escalation.
- Trigger: Confirmed pests. Action: Isolate or quarantine the plant after inspection confirms active pest evidence. Caution: Continue observation because the extent of spread may not be immediately visible.
- Trigger: Spreading symptoms. Action: Treat the issue as active rather than cosmetic when damage, spots, or discoloration continue to spread. Caution: Avoid assuming the exact cause until evidence remains consistent.
- Trigger: Root rot suspicion. Action: Escalate evaluation when root rot suspicion is supported by signs such as a persistent smell or mushy roots. Caution: Stop making additional routine care changes until the condition is assessed more clearly.
- Trigger: Repeated decline. Action: Shift to observation and a more focused review when decline continues despite reasonable corrections. Caution: Repeated changes can make the original cause harder to identify.
- Trigger: Stable condition. Action: Continue observation and prevention routines when symptoms are not spreading and plant condition remains stable. Caution: Intervening without a clear trigger may create unnecessary stress.
Prevention routines and monitoring may be sufficient when a plant remains stable and no confirmed risk is present. If confirmed pests, spreading symptoms, root rot suspicion, or repeated decline continue despite observation, a narrower problem path may represent the next safe action, while outcomes remain dependent on severity, plant condition, and growing environment.
This chart shows the decision process for handling tropical plant problems based on trigger type, with corresponding actions and cautions for each situation.