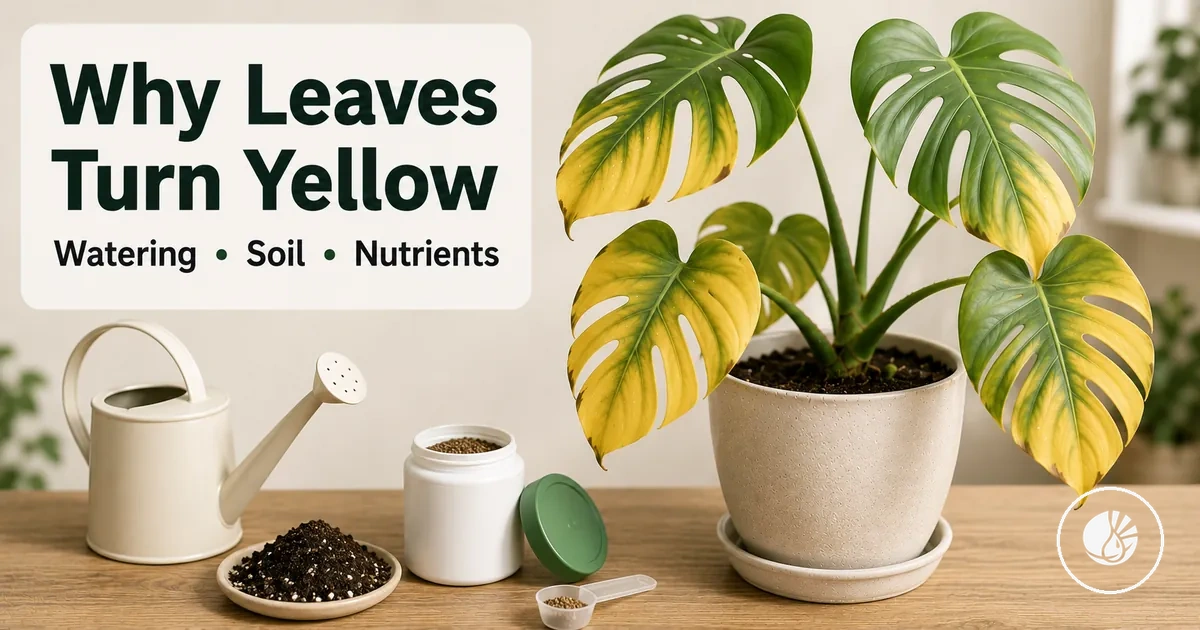
Why Indoor Tropical Plant Leaves Turn Yellow
Yellow leaves on indoor tropical plants are a symptom, not a single fixed problem. Yellowing may point to normal aging, watering imbalance, drainage problems, nutrient issues, light stress, temperature stress, repotting stress, or another recent care change, so the first diagnostic cue is the plant’s pattern, soil condition, and timing.
Yellowing leaves often need cause grouping before correction. Older lower leaves may relate to normal aging, while wider yellowing may need checks for watering, drainage, nutrients, light, or recent handling stress. The diagnosis becomes clearer when leaf pattern, texture, spread, and timing are read together.
Safe correction should follow the most likely cause instead of changing every care factor at once. A gradual adjustment may protect new growth and make the plant’s response easier to read. Check the visible symptom first, then use the diagnosis to choose the next care change.
Yellow leaves alone are not enough to confirm the cause without pattern, soil, and care-context checks. This page treats leaf yellowing as a condition-based troubleshooting signal, not as proof of one universal problem.
What Yellow Leaves Mean on Indoor Tropical Plants
Yellow leaves usually indicate reduced chlorophyll, energy reallocation, or a stress response in the leaf. On indoor tropical plants, the meaning depends on the leaf pattern and care context rather than the color alone, so the likely cause should stay conditional until the plant’s recent conditions are checked.
Normal aging may show as slower yellowing on older leaves while new growth remains active, but stress response often needs closer attention when yellowing spreads, changes texture, or appears after a care change. Root-zone conditions, nutrient availability, and environment can all influence how leaf yellowing appears. The next useful check is the pattern, position, texture, and timing of the affected leaves.
Yellowing is a symptom, not a diagnosis by itself, and it should be read alongside other indoor plant symptoms when reviewing troubleshooting plant care problems. After that boundary is clear, the next step is to separate normal aging from stress by comparing visible yellow leaf patterns.
This chart explains what yellow leaves indicate on indoor tropical plants, the key factors that influence leaf yellowing, and the steps to diagnose whether it is normal aging or stress.

Yellow Leaf Patterns That Separate Normal Aging From Stress
Yellow leaf patterns depend on leaf position, texture, spread, and timing more than color alone. Older leaves that yellow gradually often point toward normal aging, while changes involving new growth, widespread yellowing, or unusual texture may indicate plant stress. Yellow Leaf Patterns That Separate Normal Aging From Stress become easier to interpret when visible clues are organized by the next check.
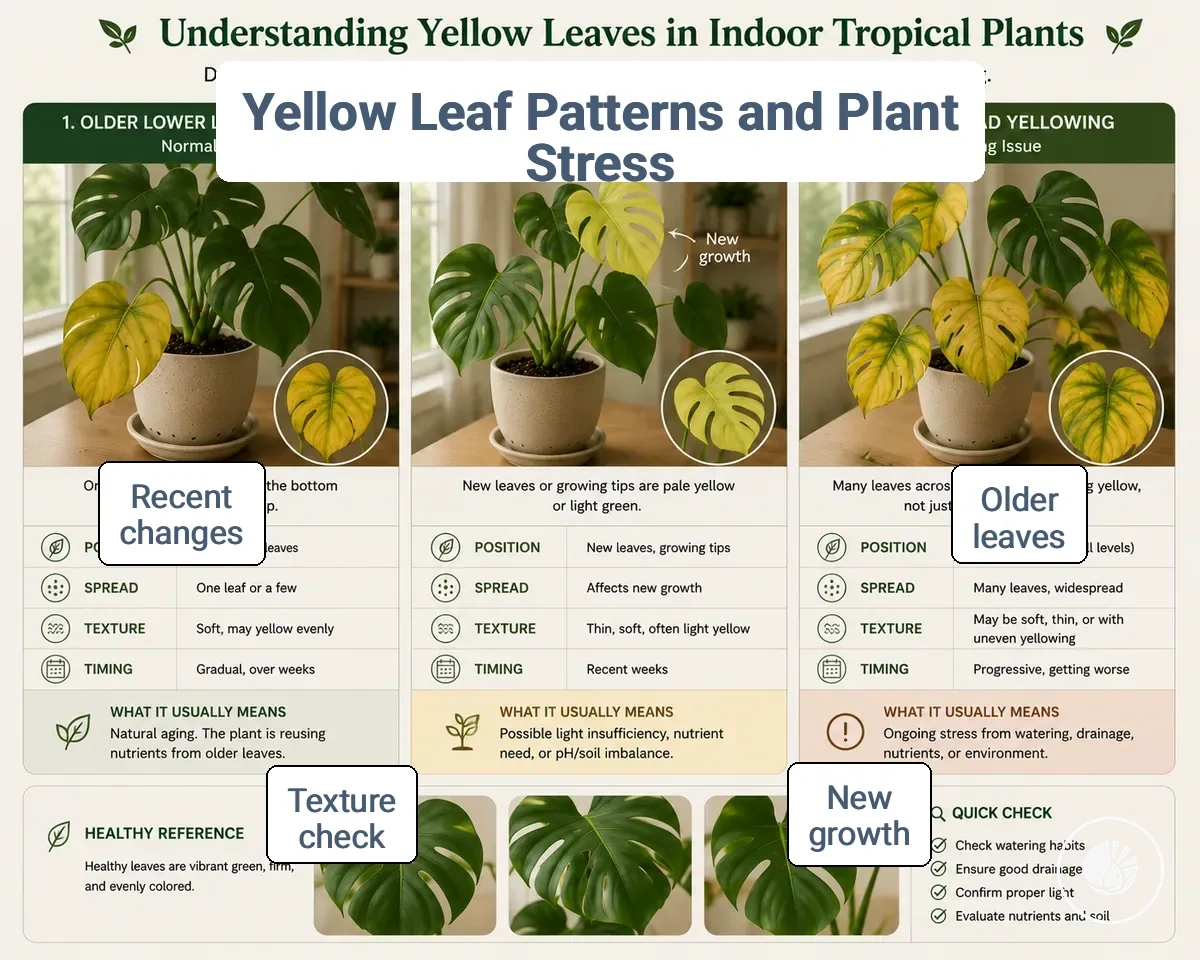
Yellow leaf patterns should be interpreted conditionally rather than treated as a definite diagnosis. Recent care changes, plant condition, and timing can change the meaning of the same yellowing pattern. Use the table to identify the most relevant next check before selecting a likely cause.
| Pattern | Likely meaning | What to check next | Risk level |
|---|---|---|---|
| Older lower leaves yellow gradually while new growth remains healthy | Often relates to normal aging | Overall plant condition and ongoing growth | Low |
| Widespread yellowing across multiple leaves | May indicate broader plant stress | Recent care changes and growing conditions | Moderate |
| Yellowing appears in new growth | May point to a current stress signal rather than aging | Growth pattern and care context | Moderate |
| Limp texture with yellowing leaves | May relate to moisture or root-zone concerns | Soil condition and root-zone environment | Moderate |
| Crispy texture with yellow edges or patches | May reflect environmental stress when timing matches a recent change | Environment, exposure conditions, and timing | Moderate |
Older Lower Leaves and Natural Leaf Shedding
Older lower leaves may be part of natural shedding when yellowing develops with slow timing, limited spread, and healthy new growth elsewhere on the plant. This pattern can occur during normal growth as resources shift toward newer foliage. However, older lower leaves are not automatically a lower concern because water, light, or nutrient stress can also begin there.
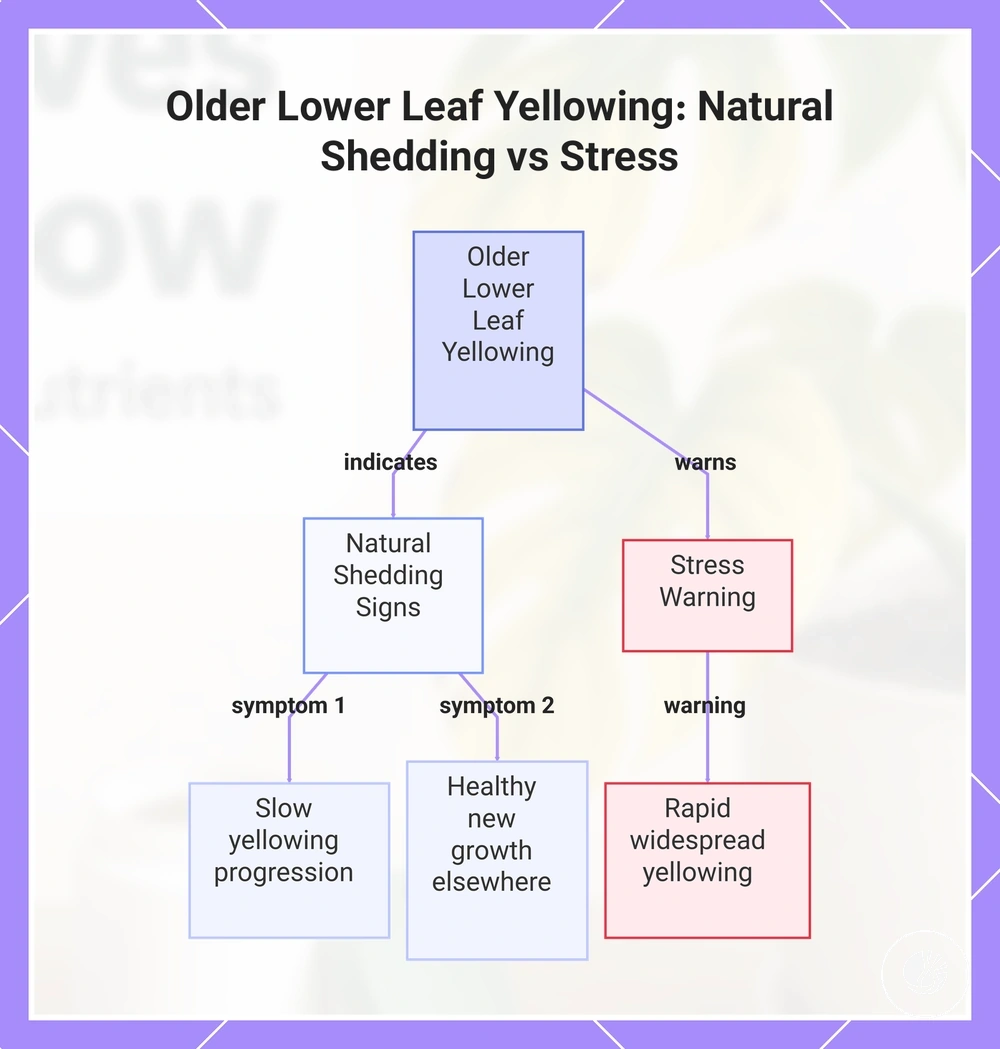
Older lower leaves are more consistent with natural shedding when yellowing remains limited to aging leaves and progresses slowly over time. Healthy new growth, older foliage position, and restricted spread are useful verification signs. For example, a few aging leaves near the base of the plant may reflect leaf turnover, while rapid yellowing across much of the plant may indicate stress and a need to check conditions.
This chart shows the key signs that indicate whether yellowing older lower leaves are part of natural shedding or a warning of stress.
New Growth, Widespread Yellowing, and Limp or Crispy Leaves
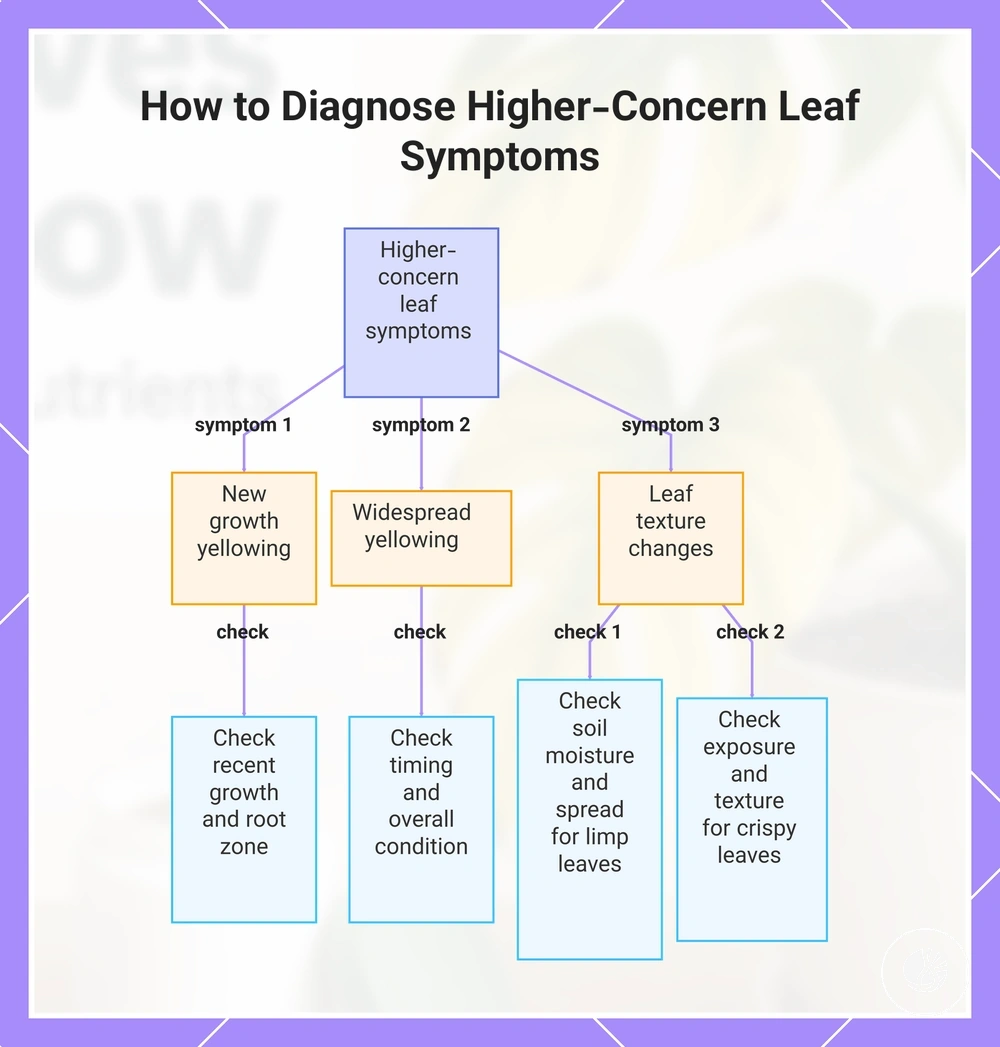
New growth, widespread yellowing, and leaf texture can change the diagnostic meaning compared with isolated yellowing on older leaves. Yellow new leaves, many affected leaves at once, limp leaves, or crispy leaves may indicate a higher-concern symptom pattern. New Growth, Widespread Yellowing, and Limp or Crispy Leaves are best interpreted through grouped visual attributes.
Appearance needs confirmation from care context because texture and spread can overlap across different problems. Check leaf texture and spread together before selecting a fix.
- Yellow new leaves: may suggest a likely condition involving nutrient availability or root stress; check recent growth and root-zone conditions.
- Widespread yellowing: may indicate a broader likely condition affecting many leaves after a recent change; check timing and overall plant condition.
- Limp leaves with soft tissue: may point toward a likely condition involving excess moisture or root stress; check soil moisture and spread of symptoms.
- Crispy leaves with dry edges: may suggest a likely condition linked to dryness or light-related stress; check leaf texture and exposure conditions.
- Yellowing with spots: may change the likely condition compared with uniform yellowing alone; check whether spots are spreading and how nearby leaves appear.
This chart shows how to interpret new growth yellowing, widespread yellowing, and leaf texture changes as higher-concern symptom patterns, and what checks to perform for each.
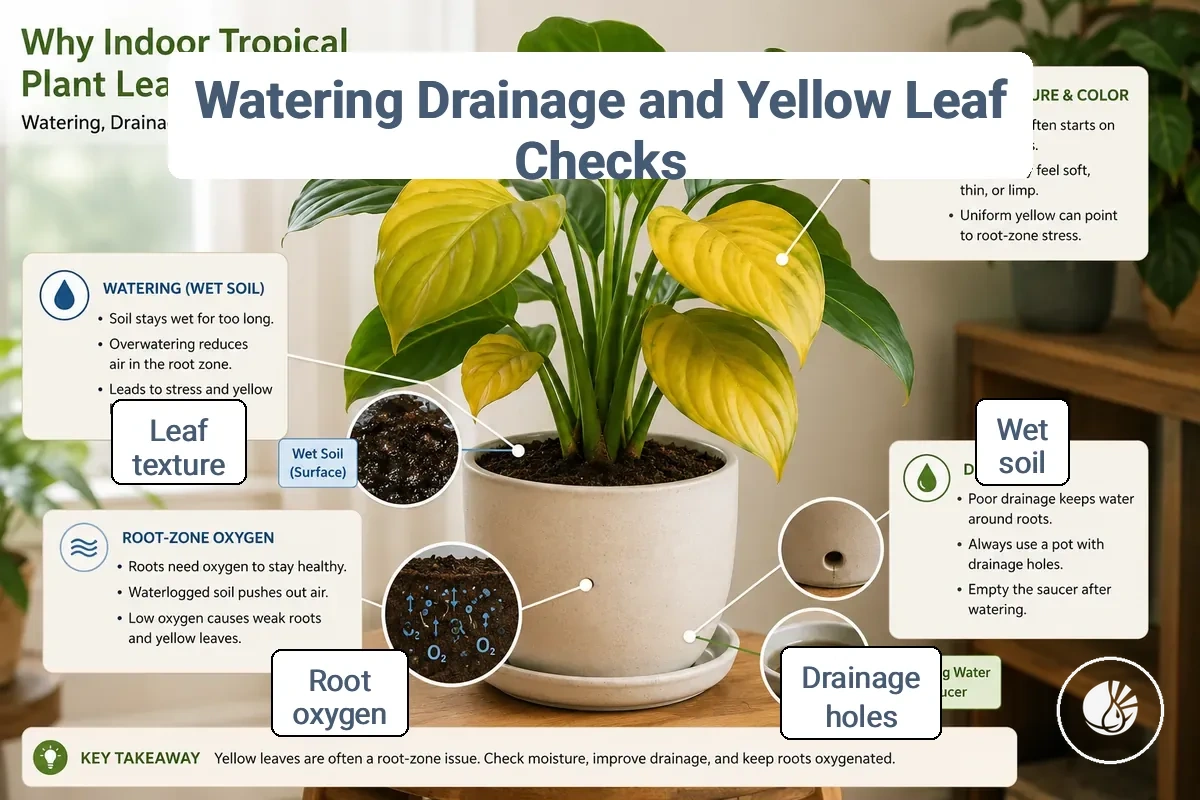
Watering, Drainage, and Root-Zone Causes of Yellow Leaves
When yellow leaves appear, moisture imbalance and root-zone oxygen problems are often a likely cause to investigate. Roots need balanced soil moisture and access to oxygen, and both wet soil and dry soil can contribute to root stress that may lead to yellow leaves. The first useful step is to verify soil moisture conditions around the root-zone.
Wet soil and dry soil can create different patterns. Wet soil may coincide with soft leaves, slower drying, and reduced root oxygen. Dry soil may coincide with crispy leaves, a dry root ball, and moisture instability. For example, soft yellowing leaves in soil that stays wet differ from crispy yellowing leaves in soil that dries quickly, so compare texture and moisture patterns together.
Drainage, pot size, and potting mix behavior can influence root-zone conditions over time. If drainage holes are restricted, the potting mix remains wet for long periods, or the container dries unusually fast, root stress may become more likely. Watering, Drainage, and Root-Zone Causes of Yellow Leaves are easier to evaluate when drainage behavior and moisture retention are inspected together.
Watering, Drainage, and Root-Zone Causes of Yellow Leaves can be verified through observable moisture and root-zone conditions. The checklist below helps separate common moisture-related patterns before moving into broader watering issues.
- Check whether the soil feels consistently wet, consistently dry, or changes rapidly between both conditions.
- Observe drying speed and whether the potting mix stays wet or dries unusually fast.
- Inspect drainage holes for unrestricted water movement and signs of a drainage problem.
- Consider whether pot size affects moisture retention and drainage behavior.
- Watch how the potting mix handles water, including compaction or uneven moisture distribution.
- Compare leaf texture, such as soft leaves or crispy leaves, with current soil conditions.
- Review the recent watering pattern for changes that may affect root-zone balance.
Potting mix performance and drainage behavior may require a deeper review of soil and drainage issues when moisture patterns remain difficult to explain.
Overwatering, Poor Drainage, and Wet Soil
When yellow leaves develop alongside wet soil, reduced root oxygen may be a contributing factor. Overwatering, poor drainage, and soggy soil can limit air movement around roots, which may contribute to root stress and soft yellow leaves. The next step is to verify whether moisture remains in the root-zone longer than expected.
Wet soil does not always result from watering frequency alone. Poor drainage, compact soil, blocked drainage, or a container that dries slowly can also create excess moisture conditions. In some cases, a plant may receive light watering yet still remain wet because the potting mix retains water or drainage behavior is restricted.
Overwatering, Poor Drainage, and Wet Soil checks should verify moisture behavior before action.
- Soil remains soggy or waterlogged for long periods after watering.
- Potting mix shows slow drying and stays consistently damp around the root-zone.
- Soft yellow leaves appear together with persistent wet soil conditions.
- A musty smell develops from the potting mix, which may indicate ongoing excess moisture.
- Blocked drainage or restricted water movement prevents normal drainage behavior.
- Wet soil and poor drainage occur together, increasing the likelihood of root stress.
Underwatering and Inconsistent Moisture
When yellow leaves appear with dry soil, underwatering or inconsistent moisture may be contributing to the problem. A dry root ball and repeated wet-dry swings can make it harder for the plant to maintain stable hydration, which may contribute to yellow leaves and moisture instability. The most useful verification step is to compare soil feel with visible leaf symptoms.
Underwatering and inconsistent moisture can share symptoms with wet-stress conditions, but the patterns often differ. Drooping may occur in both situations, while dry soil is more often associated with crispy edges, leaf curl, and a dry root ball rather than persistently damp soil. If soil feel and leaf texture do not match the expected pattern, another cause may also be contributing to the symptoms.
Underwatering and Inconsistent Moisture signs should be checked by soil feel and texture together.
- Dry soil remains difficult to rewet or develops into a dry root ball.
- Crispy edges appear alongside yellow leaves and other signs of dry stress.
- Leaf curl develops when moisture availability becomes inconsistent.
- Drooping follows periods of dryness or repeated wet-dry swings.
- Moisture instability creates alternating recovery and stress patterns in foliage.
Soil pH and Nutrient Problems That Cause Yellow Leaves
When yellow leaves appear, soil pH and nutrient problems may be contributing factors, but they need confirmation through visible patterns and growing conditions. Nutrient shortage, nutrient lockout, depleted soil, or reduced nutrient availability can affect leaf color when roots cannot access nutrients efficiently. The yellowing pattern should be interpreted cautiously because leaf color alone is not enough for diagnosis.
Leaf age and vein color can provide useful clues when evaluating nutrient problems. Older leaves that yellow first may be associated with a nitrogen-related nutrient shortage, while new yellow leaves with greener veins may resemble an iron-like chlorosis pattern. Soil pH can influence nutrient access even when nutrients are present in the growing medium. Soil pH and Nutrient Problems That Cause Yellow Leaves are easier to evaluate when symptoms are organized by nutrient access clues, as shown below.
| Symptom pattern | Likely nutrient or soil issue | Condition to check | What it suggests |
|---|---|---|---|
| Older leaves yellow first | Possible nitrogen-related nutrient shortage | Feeding history and plant growth pattern | Nutrient availability may be lower for older foliage |
| New yellow leaves with green veins | Possible iron-like chlorosis pattern | Soil pH and nutrient access | Nutrients may be present but less accessible |
| Yellowing after long periods without feeding | Possible depleted soil | Soil condition and fertilizer timing | Nutrient reserves may be reduced |
| Yellowing continues despite feeding | Possible nutrient lockout | Soil pH and root-zone condition | Nutrient access may be limited |
Feeding history and soil condition can help separate nutrient deficiency from nutrient lockout because the same yellowing pattern may have different causes. A fertilizer issue may be involved when depleted soil, delayed feeding, or reduced nutrient availability aligns with the observed symptoms. For deeper interpretation of nutrient problems, use symptom patterns together with care history rather than leaf color alone. If moisture or root-zone stress signs are present, nutrient correction should follow those checks first.
Light, Temperature, and Repotting Stress Behind Yellowing Leaves
Environmental stress and recent handling can trigger yellowing leaves even when watering and nutrition seem reasonable. Light stress, temperature stress, relocation, or repotting stress may change how the plant uses water and energy, so yellowing should be compared with the plant’s recent context. Timing is the main clue when yellowing appears soon after a placement or handling change, and Light, Temperature, and Repotting Stress Behind Yellowing Leaves is shown in the image through placement and recent-handling cues.
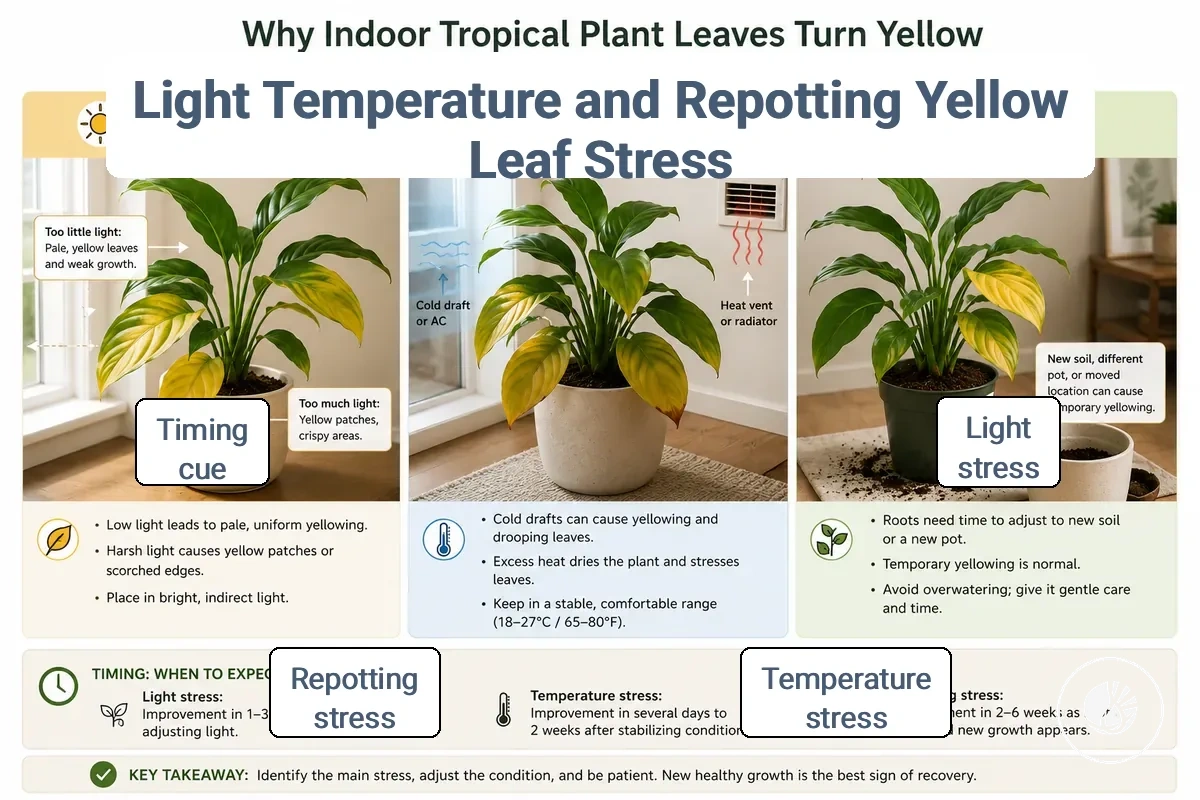
Low light may lead to slower decline when the plant receives less usable light than it needs. Direct sun may create yellow patches or scorch-like areas when exposure is too harsh for the plant’s current condition. Cold drafts and heat stress may affect leaves near windows, doors, vents, or hot surfaces. Placement should be checked before assuming the yellowing has a nutrient or watering cause.
Repotting stress or relocation can cause yellowing when root disturbance, changed soil moisture behavior, or a new position alters the plant’s conditions. If yellowing begins shortly after moving or repotting, the recent event becomes part of the diagnosis rather than proof of one exact cause. The comparison below separates the main stress contexts without turning them into full care routines.
| Stress source | Common yellowing context | What to check | What not to assume |
|---|---|---|---|
| Low light | Slow yellowing or weaker growth after placement in a dimmer area | Recent relocation, distance from light, and new growth response | Do not assume all yellowing is from lack of light |
| Direct sun | Yellow patches, pale areas, or crispy marks on exposed leaves | Window exposure, strongest light period, and leaf position | Do not treat every yellow patch as sun damage |
| Cold drafts | Yellowing after exposure near doors, windows, or cool airflow | Draft path, cool exposure, and affected leaf location | Do not assume the plant needs more watering first |
| Heat stress | Yellowing or drying near heat vents, hot glass, or warm surfaces | Heat source, airflow, and leaf texture | Do not assume heat stress without checking placement |
| Repotting stress | Yellowing after repotting, root disturbance, or changed moisture behavior | Timing, root-zone condition, and soil drying pattern | Do not assume repotting shock is automatic |
Low Light, Direct Sun, and Cold Draft Stress
When yellowing signals appear, low light, direct sun, or cold draft stress may be contributing factors. Low light can coincide with slow yellowing and weak growth, while direct sun may be associated with yellow patches or leaf scorch in exposed areas. Placement verification is often the most useful next check when comparing these yellowing signals.
Low light may affect an indoor tropical plant after a placement change into a dimmer location, especially when yellowing develops gradually. Direct sun may create leaf scorch or pale yellow patches when exposure increases suddenly rather than gradually. Cold drafts and nearby heat vents can contribute to temperature stress when leaves are exposed to repeated airflow or temperature changes. A recent placement change often matters more than the room label alone when interpreting yellowing signals.
Yellow Leaves After Repotting or Root Disturbance
Yellow leaves after repotting can appear when root disturbance, new soil, pot size changes, or altered moisture behavior create transplant stress. The plant may need time to adjust after handling, especially if the roots were disturbed or the new soil holds water differently. Timing helps separate short adjustment from a developing problem.
Mild yellowing shortly after repotting may be less concerning when it stays limited and the plant remains otherwise stable. Worsening signs, spreading yellow leaves, limp texture, or stalled new growth may suggest that root stress or moisture behavior needs closer checking. A larger pot or more water-retentive new soil can keep the root-zone wet longer than expected. If yellowing follows repotting but the soil remains wet, the issue may be excess moisture in the new pot rather than repotting stress alone.
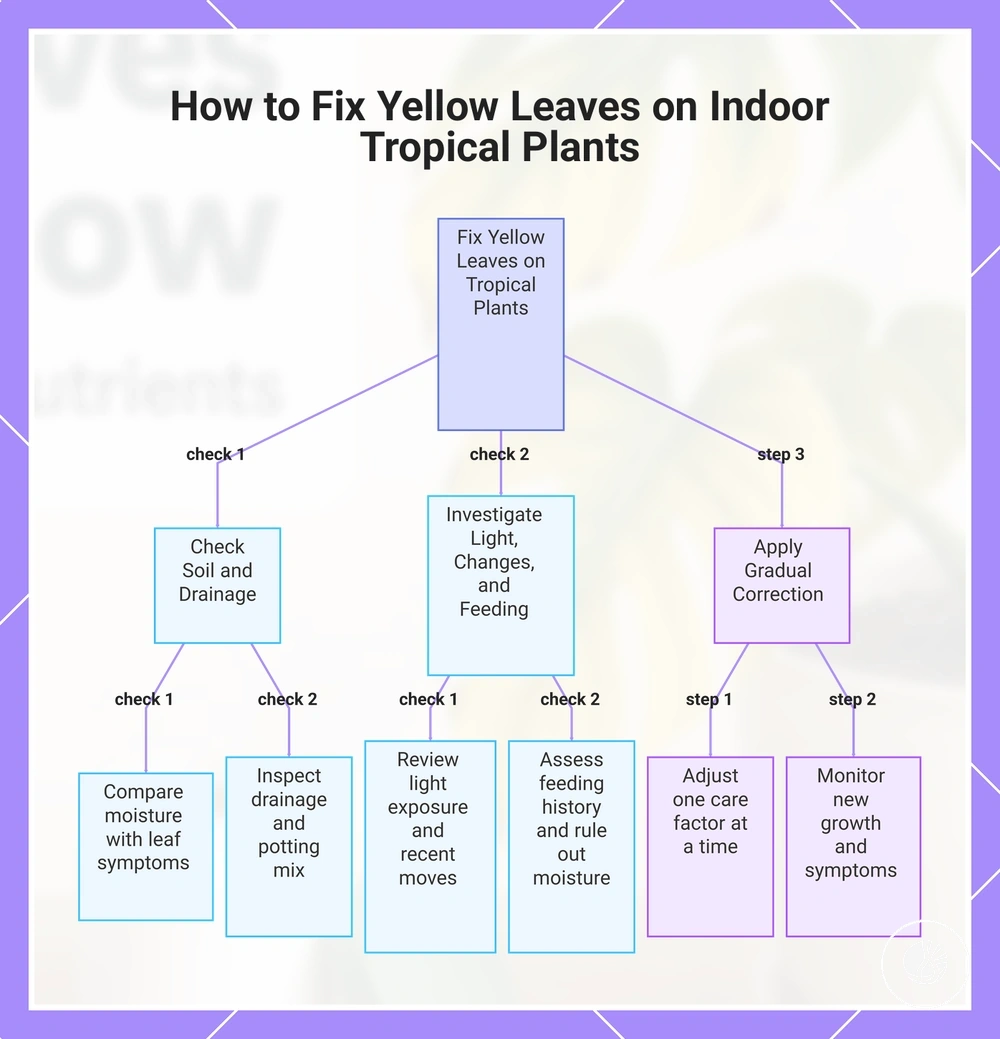
How to Fix Yellow Leaves on Indoor Tropical Plants
Fix yellow leaves on indoor tropical plants by identifying the cause before adjusting care. Yellowing can result from different conditions, so the appropriate remedy depends on soil moisture, drainage, light exposure, recent changes, feeding history, and symptom progression. Avoid making multiple care changes at the same time because that can make the cause harder to identify.
How to Fix Yellow Leaves on Indoor Tropical Plants follows a sequence that moves from observation to gradual correction. Diagnose first, then make one care adjustment at a time and monitor the plant's response. Use the steps below to organize diagnosis before correction.
- Check soil moisture and compare it with leaf symptoms. If the soil is consistently wet or dry, focus on that condition first before considering other causes.
- Inspect drainage and the potting mix. If water remains around the root-zone longer than expected, address drainage-related concerns before making other care adjustments.
- Review light exposure and any recent placement changes. If yellowing began after a move, use that timing clue before changing another care factor.
- Consider recent changes such as repotting, temperature shifts, or watering adjustments. If symptom progression matches a recent change, use that observation to identify the likely cause.
- Review feeding history and overall soil condition. If nutrient availability may be involved, first confirm that soil moisture and drainage do not better explain the yellowing.
- Apply one gradual correction based on the most likely cause and monitor new growth and symptom progression. For example, changing water, light, soil, and fertilizer at the same time can make it difficult to determine which care adjustment influenced the yellowing.
This chart shows the diagnosis and correction process for yellow leaves on indoor tropical plants, guiding you from observation to gradual care adjustments.
Check Moisture, Drainage, Light, and Recent Care Changes
When yellow leaves appear, verify each observable condition before adjusting care. Check Moisture, Drainage, Light, and Recent Care Changes organizes the first diagnostic checks so likely causes can be compared before action. Use the checklist below to review the most relevant signals.
- Moisture: Check whether the soil feels consistently wet, consistently dry, or shifts between extremes.
- Drainage: Verify drainage behavior and whether water moves through the pot or remains around the root-zone.
- Light: Review light placement and whether yellowing started after a move to a brighter or dimmer location.
- Temperature: Check for recent exposure to cold drafts, heat vents, or other temperature exposure near the plant.
- Repotting timing: Verify whether yellow leaves appeared after repotting, root disturbance, or a pot size change.
- Recent care changes: Review any fertilizer change or watering change and compare the timing with symptom progression.
- Care history: If multiple signals overlap, give priority to the strongest recent care changes before making a care adjustment.
Adjust Water, Feeding, and Placement Gradually
Adjust water, feeding, and placement gradually after identifying the most likely cause of yellow leaves. A gradual care adjustment can reduce the risk of adding new stress while correcting an observable condition. Continue monitoring plant response and new growth after each change.
Multiple simultaneous changes can hide the real cause of improvement or decline. Adjust Water, Feeding, and Placement Gradually by using staged corrections and observation. Use the steps below to prevent new stress while correcting likely causes.
- Water: Make a watering correction based on current soil moisture and monitor whether symptoms stabilize before making another change.
- Drainage: Improve drainage behavior when excess moisture appears likely, then observe how soil moisture changes over the next observation interval.
- Feeding: Use cautious feeding only when a nutrient issue appears likely and monitor plant response before adjusting feeding again.
- Placement: Make placement changes gradually when light or temperature conditions appear relevant, then observe whether new growth responds differently.
- Monitoring: Review symptom progression after each small correction and avoid combining multiple changes during the same observation interval.
Severely damaged leaves may not turn green again even when overall plant condition improves.
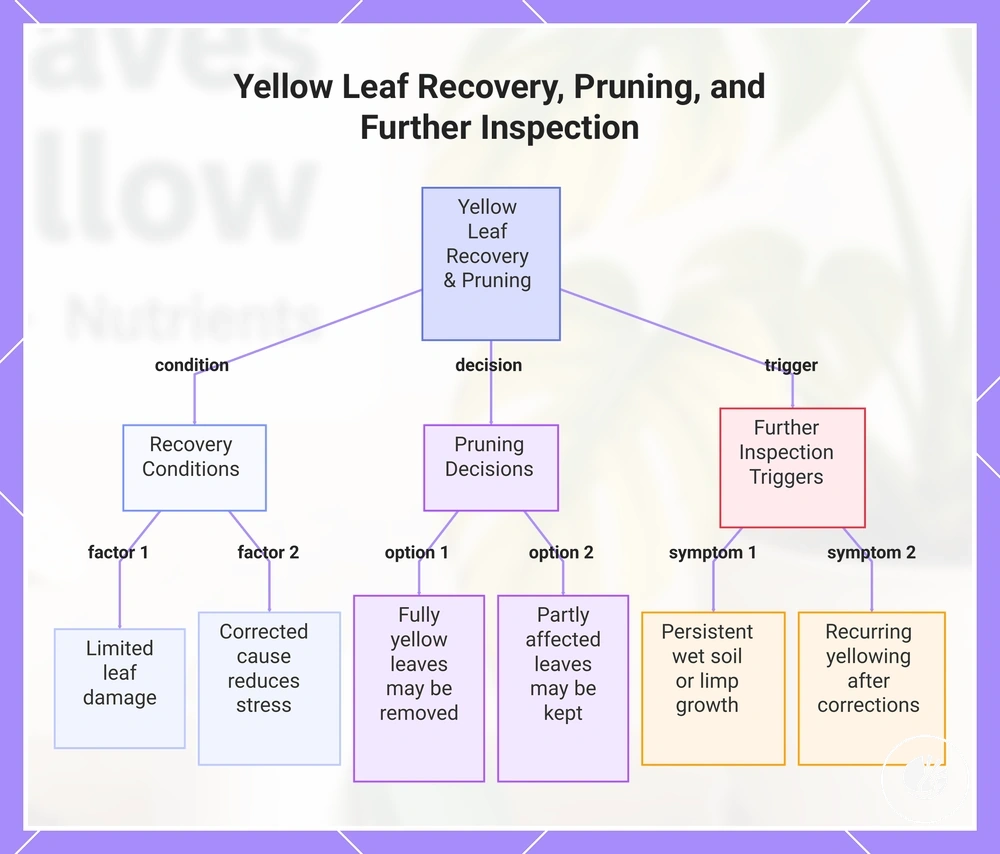
Yellow Leaf Recovery, Pruning, and Further Inspection
Yellow leaf recovery depends on leaf damage, plant vigor, and whether the corrected cause has reduced stress. Early yellowing may improve when damage is limited, but fully yellow leaves are unlikely to regain full green color. Separate leaf recovery from overall plant recovery.
Pruning should depend on how damaged the leaf is and how the plant responds. Fully yellow or declining leaves may be removed when they are no longer supporting the plant, while partly affected leaves may be kept if they still look functional. New growth is the stronger signal for monitoring plant recovery.
Further inspection becomes more important when yellowing continues, spreads, or appears with weak plant vigor after care adjustments. Root inspection may be needed when persistent wet soil, limp growth, or escalation signs suggest a deeper check. Recurring yellowing can also point beyond one leaf issue toward the broader care setup, so review indoor tropical plant care solutions when symptoms keep returning. Yellow Leaf Recovery, Pruning, and Further Inspection should separate recovery, pruning, and escalation decisions before more changes are made.
- Early yellowing may recover if leaf damage is limited and the corrected cause supports new growth.
- Fully yellow leaves are unlikely to regain full green color, so pruning may be reasonable when they decline further.
- New growth should be monitored as the main sign of plant recovery and renewed vigor.
- Persistent wet soil, spreading yellowing, or weak growth may justify root inspection.
- Escalation signs after corrections suggest a deeper review of the wider care setup.
This chart shows the key factors for yellow leaf recovery, pruning decisions based on leaf damage, and triggers for further inspection.
When Yellow Leaves Can Recover
Yellow leaves recover only when the leaf is partially yellow and the corrected cause has reduced stress before damage becomes severe. A fully yellow leaf is usually more damaged and may not return to green. Recovery depends on the extent of damage and the corrected moisture or stress condition.
Leaf recovery and plant recovery are not the same outcome. A partially yellow leaf may show improvement when healthy stems, corrected moisture, and reduced stress support recovery. The overall plant may recover even when fully yellow leaves remain unchanged. Active new growth is often a stronger sign of plant recovery than the appearance of older leaves.
When to Remove Yellow Leaves or Check for Deeper Problems
Remove yellow leaves only when they are fully yellow, damaged, or no longer useful to the plant. Removing yellow leaves may improve appearance, but it does not address deeper problems. When yellowing continues after correction, inspection is usually a higher priority than pruning.
Deeper problems may be present when warning signs extend beyond leaf color. Mushy tissue, root odor, spreading symptoms, stalled growth, or persistent wet soil can justify closer inspection. Repeated yellowing after correction may suggest that the underlying issue has not been fully resolved. Recurring symptoms should be evaluated against the broader indoor tropical plant care setup.
When to Remove Yellow Leaves or Check for Deeper Problems depends on whether the signs point to simple cleanup or deeper diagnosis.
- Fully yellow leaves may be removed when they no longer contribute to plant function.
- Mushy tissue may indicate a deeper problem that deserves inspection before additional pruning.
- Spreading symptoms across multiple leaves may justify further investigation.
- Root odor together with persistent wet soil can be a warning sign that warrants closer inspection.
- Stalled growth after care adjustments may suggest that stress is still affecting the plant.
- Repeated yellowing after correction may indicate that the original cause remains unresolved.